
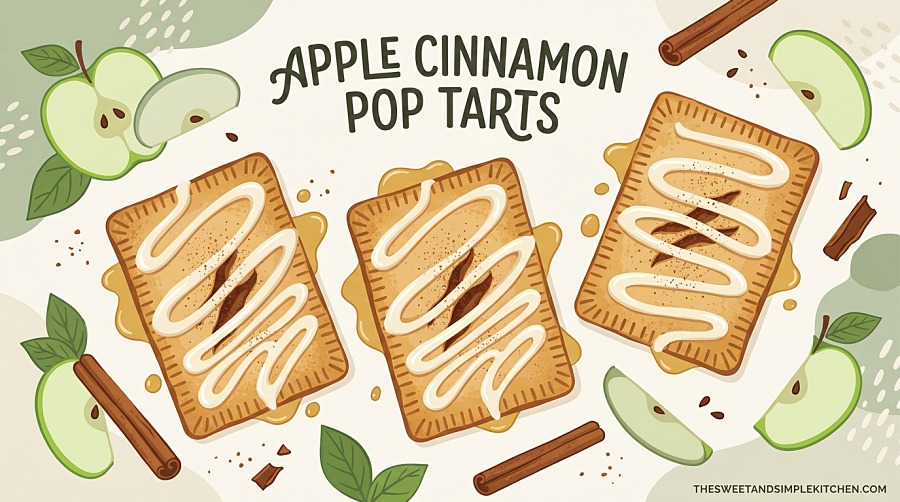
Growing up, my mum absolutely refused to buy pop tarts. She called them “cardboard with frosting” and wouldn’t even let them past the pantry door. As a stubborn kid who just wanted to eat the same lunchroom snacks as everyone else, this felt like a personal injustice. So she did what mums do — she promised me a homemade version that would taste “a million times better.” I rolled my eyes. Then I smelled the buttery, cinnamon-spiced apples bubbling on her stove, and I knew, as always, she was right.
This apple cinnamon pop tarts recipe is the one she made me, refined over years of pie-crust mistakes and apple-variety experiments. Buttery, flaky pastry hugging a spiced apple-pie filling, finished with a tangy cream cheese glaze. Twelve hand-held tarts, one cozy afternoon, and a kitchen that smells like the best parts of fall — even if you’re making them in the middle of September.
Apple cinnamon pop tarts are homemade hand pies with buttery pie crust, spiced apple filling, and a sweet glaze. Cooked apples (Granny Smith plus Honeycrisp work best) are tossed with cinnamon and brown sugar, sealed inside dough rectangles, and baked at 375°F until golden — about 18–20 minutes. Flakier and far better than store-bought.
| Prep time | 45 minutes (+ 30 min chill) |
| Cook time | 18–20 minutes |
| Total time | 1 hour 35 minutes |
| Servings | 12 pop tarts |
| Difficulty | Intermediate |
| Calories (per tart, approx.) | 295 |
| Cuisine | American |
Table of Contents
What you’ll learn
- The exact apple combination that holds its shape and tastes like real apple pie
- A simple cornstarch trick that stops the dreaded filling leak
- A double-chill technique that keeps your pop tarts crisp and bakery-neat
- How to make ahead, freeze, and reheat for grab-and-go breakfasts
Why This Apple Cinnamon Pop Tarts Recipe Works
I’ve made these enough times to have opinions, and here’s what separates a great homemade pop tart from a leaking, soggy disappointment.
The crust is all butter, not shortening. Butter has water in it (about 16–18%), which turns to steam in the oven and pushes the dough layers apart — that’s where flake comes from. Shortening crusts are sturdier but they taste like nothing.
The filling is cooked first, then thickened. Raw apple chunks won’t soften enough in 20 minutes of baking, and uncooked apples release tons of liquid as they sit, which guarantees a soggy bottom. We pre-cook the apples and reduce them with cornstarch so the filling is jam-thick before it ever touches the dough.
There’s a double-chill. Most recipes chill the dough once. We chill the assembled tarts again before they hit the oven — this firms up the butter (so the layers stay layered) and helps the dough relax so it doesn’t shrink and split open mid-bake.
The glaze is cream cheese, not just powdered sugar and water. A bit of softened cream cheese cuts the sweetness and adds a tangy hit that balances the spiced apples. It’s the same logic as cream cheese frosting on carrot cake — fat plus acid keeps the sweetness from being one-note.
Ingredients You’ll Need
A note before the list: every measurement here matters. Pastry is forgiving once you understand the why, but the ratios are doing real work.
For the all-butter pie crust
- 2½ cups (313g) all-purpose flour — unbleached if you have it
- 3 tbsp granulated sugar — just enough to feed browning, not enough to sweeten
- 1 tsp fine sea salt or kosher salt
- 1 cup (227g) cold unsalted butter, cubed — straight from the fridge, ideally 30 minutes in the freezer first
- ½ cup ice water (plus up to 2 tbsp more if needed)
- 1 tbsp fresh lemon juice — the acid relaxes gluten and keeps the crust tender
For the apple cinnamon filling
- 4 medium apples (about 1¾ lb / 800g), peeled, cored, and finely diced — see the apple variety section below for the best mix
- ¾ cup (165g) light or dark brown sugar, packed
- 1 tbsp cornstarch — the non-negotiable thickener
- 1 tsp ground cinnamon — Saigon or Vietnamese cinnamon if you can find it; the flavor is bigger
- ¼ tsp freshly grated nutmeg
- ½ tsp lemon zest plus 1 tsp lemon juice
- 1 tbsp unsalted butter
- Pinch of fine salt
For the egg wash
- 1 large egg, lightly beaten
- 1 tsp heavy cream or milk
- Pinch of granulated sugar (for sprinkling, optional but pretty)
For the cream cheese glaze
- 2 tbsp full-fat cream cheese, softened to room temperature
- 3 tbsp whole milk (start with 2 and add more as needed)
- 1½ cups (180g) powdered sugar, sifted
- ¼ tsp vanilla extract
- Pinch of cinnamon (optional, for sprinkling)
Substitutions and notes
- Butter: European-style butter (Kerrygold, Plugrá) has more fat and less water — it gives an even flakier crust if you can find it.
- Cornstarch swap: Tapioca starch works at the same ratio. Don’t use flour as a 1:1 swap — it’s only about half as effective.
- Cream cheese: Use full-fat block-style, not whipped or low-fat. The water content in low-fat cream cheese will thin your glaze too much.
- Apples: A mix is better than a single variety (more on this below). If you only have one type, Honeycrisp is the most reliable single-variety choice.
Equipment You’ll Need
Nothing fancy. Most of this is already in your kitchen.
- Two rimmed baking sheets
- Parchment paper
- A rolling pin
- A medium saucepan for the filling
- A pastry cutter or your fingers (a food processor works too)
- A pastry brush
- A sharp knife or pizza cutter for trimming
- A fork for crimping
- A skewer or toothpick for venting
- A wire cooling rack
How to Make Apple Cinnamon Pop Tarts (Step by Step)
Step 1 — Make the pie crust
In a large bowl, whisk together the flour, sugar, and salt. Add the cubed cold butter and toss it in the flour to coat each cube — this is your insurance policy against sticky butter clumps.
Using a pastry cutter (or your fingertips, working quickly so the butter doesn’t melt), cut the butter into the flour until you have a mix of pea-sized and almond-sized chunks of butter. Don’t overwork it. Visible butter is the entire point.
Mix the lemon juice into the ice water. Drizzle it over the flour-butter mixture in three additions, tossing with a fork between each one. Stop adding water when the dough starts to clump together — you may not need all of it, or you may need an extra tablespoon. The dough should look shaggy and barely held together, not smooth.
Turn the dough out onto a clean surface, divide it in half, and shape each half into a 1-inch-thick rectangle. Wrap tightly in plastic and chill for at least 30 minutes (and up to 2 days).
Step 2 — Make the apple cinnamon filling
While the dough chills, melt the butter in a medium saucepan over medium heat. Add the diced apples, brown sugar, cinnamon, nutmeg, lemon zest, lemon juice, and salt. Stir to coat.
Cook for 6–8 minutes, stirring occasionally, until the apples have softened and released their juices. In a small bowl, whisk the cornstarch with 1 tablespoon of cold water to make a slurry. Stir the slurry into the apple mixture and cook another 2–3 minutes until the liquid thickens and clings to the apples like a glossy syrup.
Remove from the heat and spread the filling onto a plate or shallow bowl to cool completely. This step matters — warm filling will melt your dough and make assembly miserable. Cool to room temperature, or speed it up in the fridge for 15 minutes.
Step 3 — Roll and cut the dough
Preheat your oven to 375°F (190°C) and line two baking sheets with parchment.
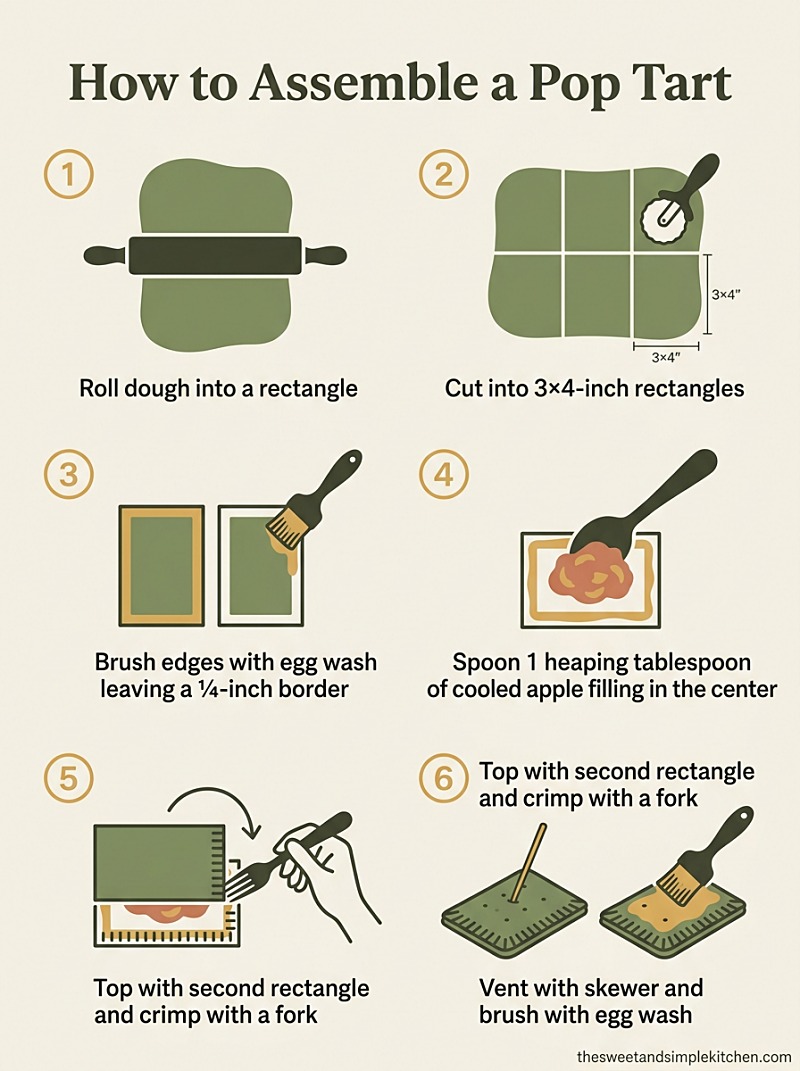
Take one rectangle of dough out of the fridge. Set it on a lightly floured surface, dust the top with flour, and roll into a rectangle roughly 12 × 16 inches and ¼ inch thick. Use a sharp knife or pizza cutter to trim the edges square, then cut into 12 equal rectangles (about 3 × 4 inches each). Repeat with the second piece of dough — you want 24 rectangles total to make 12 finished pop tarts.
Transfer 12 of the rectangles to your prepared baking sheets, spacing them about an inch apart. These are your bottoms.
Step 4 — Assemble
Brush the edges of each bottom rectangle with egg wash — about a ¼-inch border. Spoon a heaping tablespoon of cooled apple filling into the center of each one, keeping it well clear of the egg-washed border. Don’t overfill. Two tablespoons sounds like more flavor but it’s more leakage.
Lay a second rectangle on top of each filled bottom. Press the edges down with your fingers first to seal, then crimp all the way around with the tines of a fork. Trim any uneven edges with a knife.
Step 5 — The double-chill (don’t skip this)
Pop the assembled tarts into the fridge for 20 minutes. While they chill, the dough relaxes and the butter firms back up. This is the single biggest difference between pop tarts that hold their shape and pop tarts that puff weirdly and split at the seams.
Step 6 — Egg wash, vent, and bake
Take the tarts out of the fridge. Brush the tops with the remaining egg wash and sprinkle with a pinch of granulated sugar for crunch and shine. Use a skewer or fork to poke 4–5 small steam vents in the top of each tart — these let pressure escape so the tarts don’t burst.
Bake on the center rack at 375°F for 18–20 minutes, rotating the pans halfway through, until the tops are deeply golden brown. They should look like toasted brioche, not pale and underdone — pale crust = doughy crust.
Cool on the pan for 5 minutes, then transfer to a wire rack to cool completely before glazing.
Step 7 — Make the cream cheese glaze
In a medium bowl, beat the softened cream cheese with 2 tablespoons of milk until completely smooth (no lumps — lumps will jam your drizzle). Add the powdered sugar and vanilla and beat on low until smooth and pourable. If it’s too thick, add milk a teaspoon at a time. If it’s too runny, add powdered sugar a tablespoon at a time.
Drizzle or spoon the glaze over the cooled pop tarts. Sprinkle with a tiny pinch of cinnamon if you want them to look like the brown-sugar cinnamon ones from childhood. Let the glaze set for about 15 minutes before serving.
The Best Apples for This Recipe
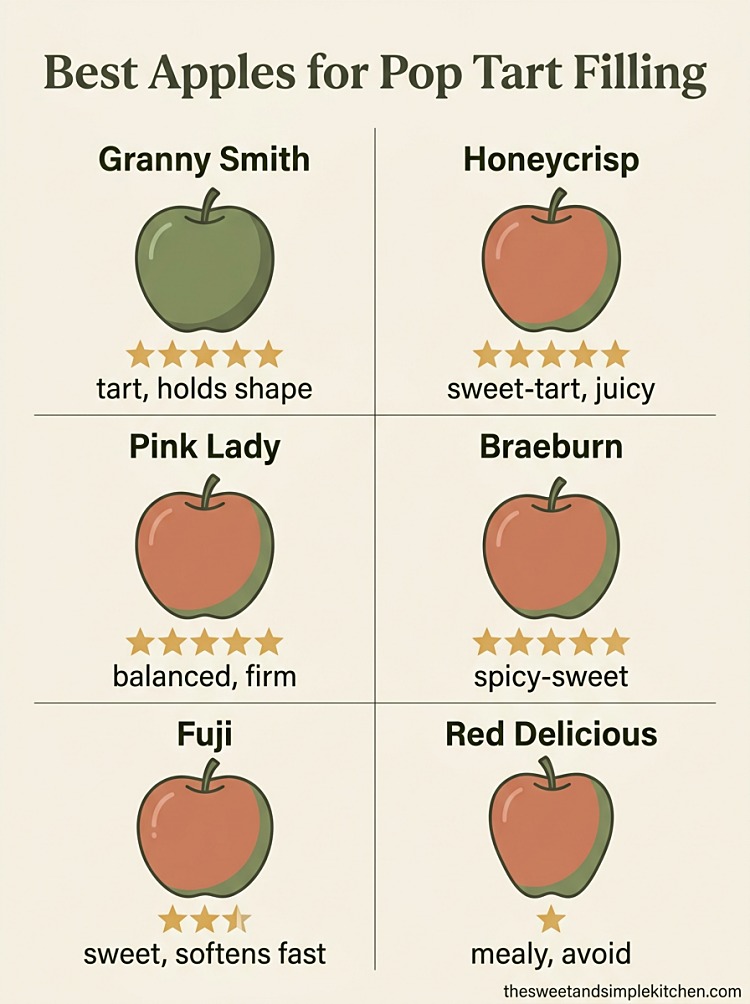
Single-variety apple pies are like single-variety wines — fine, but missing complexity. The pros at King Arthur Baking have written extensively about the value of combining apple varieties for the best pie filling, and the same logic applies to pop tarts. You want one apple that holds its shape under heat (a tart, firm variety) and one that breaks down a little to give you that jammy, almost saucy texture (a sweeter, juicier variety).
My go-to pairing is Granny Smith plus Honeycrisp — Granny Smith for tart structure, Honeycrisp for sweet juiciness. Pink Lady or Braeburn are excellent backup picks if your produce section is thin on options.
Apples to avoid: Red Delicious (mealy when cooked), McIntosh (too soft, turns to mush), and most Galas (too watery, lose their flavor under heat).
Pro Tips for Perfect Pop Tarts Every Time
After a lot of cracked, leaking, lopsided test batches, these are the small things that consistently make the difference.
Pro tip: Keep your butter, water, and even your flour cold. On a hot summer day, I’ll stick the flour bowl in the freezer for 10 minutes before I start. Cold ingredients = laminated layers = flake.
Don’t skip the cornstarch slurry. Even thick-looking apple filling will release liquid as it bakes. The cornstarch sets that liquid into a soft gel inside the pastry instead of letting it run out the seams.
Dock the tops, don’t slash them. A few tiny holes from a skewer or toothpick let steam escape without making big visible cuts that the filling can ooze through. Decorative slashes look cute and leak everything.
Trim before you bake, not after. If your edges are uneven, run a sharp knife around the rectangles before they go in the oven. Trying to neaten them after baking just shatters the crust.
Glaze cooled tarts only. Glaze on a warm pop tart will slide right off and turn into a sad puddle. Wait the full 30 minutes if you can.
Bake one sheet at a time on the center rack if your oven is small or runs uneven. Two sheets at once means rotating front-to-back AND top-to-bottom halfway through.
Variations to Try
Once you’ve got the technique down, the filling is endlessly swappable.
- Brown sugar cinnamon (the classic): Skip the apples. Mix ½ cup brown sugar, 2 tbsp flour, and 1½ tsp cinnamon. Use 1 heaping tsp per tart. This is the OG flavor and it’s incredible.
- Apple cranberry: Add ½ cup fresh or frozen cranberries to the apple filling. The tartness is gorgeous against the sweet glaze.
- Caramel apple: Drizzle homemade caramel over the cooled apple filling before sealing. Top with flaky sea salt instead of glaze.
- Apple pie spice: Swap the cinnamon and nutmeg for 1½ tsp apple pie spice for a more bakery-shop flavor profile.
- Maple glaze: Replace the milk in the glaze with pure maple syrup for a fall-in-a-glass topping.
- Vegan version: Use vegan butter (Earth Balance or Miyoko’s), swap the egg wash for unsweetened plant milk plus a pinch of sugar, and skip the cream cheese in the glaze.
Make-Ahead, Storage, and Freezer Instructions
This is one of those recipes that’s almost better when you build it in stages.
Pie dough: Make up to 3 days ahead and refrigerate, or freeze for up to 3 months. Thaw overnight in the fridge before rolling.
Apple filling: Make up to 3 days ahead and refrigerate in an airtight container. Bring to room temperature before assembling.
Assembled, unbaked tarts: Freeze in a single layer on a parchment-lined sheet until solid (about 2 hours), then transfer to a freezer bag for up to 2 months. Bake straight from frozen at 375°F for 25–28 minutes — no thawing needed.
Baked tarts (unglazed): Store in an airtight container at room temperature for 2 days, in the fridge for up to 5 days, or in the freezer for up to 2 months.
Glazed tarts: Best within 24 hours of glazing. The glaze starts to soak into the crust after that, which doesn’t make them inedible, but they lose their bakery-neat finish.
Reheating: A toaster oven or 350°F oven for 5–7 minutes brings the crispness right back. Avoid the microwave — it makes the crust soft and rubbery.
Serving Suggestions
These are obviously breakfast-coded, but I’d argue they’re a better dessert than they are a breakfast. A warm pop tart with a scoop of vanilla bean ice cream is essentially a portable apple pie à la mode.
Pair them with a strong cup of coffee, a cinnamon-spiced chai, or a cold glass of milk for kids. For brunch spreads, slice them in halves or quarters so guests can sample alongside other pastries.
For a dessert presentation, warm the pop tart slightly, drizzle with extra glaze, and add a small scoop of cinnamon or salted caramel ice cream.
Common Mistakes and How to Fix Them
Filling leaked everywhere. Three usual suspects: too much filling, no cornstarch in the filling, or edges weren’t sealed properly. Stick to a heaping tablespoon, always use the slurry, and crimp twice (fingers first, then fork).
Crust was tough, not flaky. You overworked the dough. The butter melted before it hit the oven, or you kneaded the dough until it came together smooth instead of stopping at shaggy. Next time: keep everything cold, stop sooner, and rest the dough longer.
Pop tarts puffed up like pillows. Not enough vent holes, or the tarts went into the oven warm. Poke at least four small holes per tart and chill the assembled tarts for the full 20 minutes.
Bottoms were soggy. Filling was too wet (cook it down further next time, or add an extra ½ tsp cornstarch), or the oven wasn’t hot enough. Use an oven thermometer to check — most home ovens run cooler than the dial says.
Glaze slid right off. The pop tarts were still warm. Patience.
Edges burned before centers cooked. Your oven runs hot, or your tarts were too thin. Either tent the edges with foil for the last 5 minutes, or roll the dough slightly thicker (a hair over ¼ inch) next time.
Frequently Asked Questions
Why are my homemade pop tarts leaking filling?
The two most common causes are overfilling and skipping the cornstarch slurry. Stick to a heaping tablespoon of filling per tart, leave a clear ¼-inch border for sealing, and always cook the apples down with cornstarch so the filling is jam-thick before it goes in. Sealing the edges twice — fingers first, then a fork — gives you a tight seam that holds through baking.
Can I use store-bought pie crust for this apple cinnamon pop tarts recipe?
Yes, and I won’t judge you. Two refrigerated pie crusts (the kind that come rolled in a box) will give you about 8–10 pop tarts instead of 12, and the crust will be slightly less flaky than homemade, but the apple filling is doing most of the heavy lifting flavor-wise. Puff pastry also works — it gives you an extra-flaky, croissant-adjacent texture that’s lovely but less classic.
Can I make these ahead of time?
Absolutely. The dough keeps in the fridge for up to 3 days or the freezer for 3 months. The apple filling keeps in the fridge for up to 3 days. You can fully assemble the tarts, freeze them raw, and bake straight from frozen — that’s my favorite version of “ahead of time” because the texture is identical to fresh.
Can I freeze homemade apple cinnamon pop tarts?
Yes, and they freeze beautifully. For best results, freeze them assembled but unbaked — bake from frozen for 25–28 minutes. Baked, unglazed tarts also freeze well for up to 2 months; reheat in a 350°F oven for 5–7 minutes and glaze after they cool. I don’t recommend freezing already-glazed tarts because the glaze gets weepy as it thaws.
What’s the best way to reheat homemade pop tarts?
A toaster oven or conventional oven at 350°F for 5–7 minutes is ideal — the crust crisps back up and the filling warms through. Avoid the microwave; it softens the pastry and makes everything rubbery. If you have a regular toaster and the tarts are flat enough, that works too, just watch carefully so they don’t scorch.
Can I use puff pastry instead of pie dough?
You can, and it’s faster, but the texture is different. Puff pastry gives you tall, shatter-flaky layers — more like a turnover than a classic pop tart. Pie dough gives you the dense, biscuity texture that matches the original. Both are delicious; pick based on your mood.
How do I know when my pop tarts are done?
Look for deep golden brown tops — not pale, not just barely golden. The bottoms should be the same color. If you’re unsure, lift one with a spatula and peek underneath. Pale bottoms mean the dough is still raw inside; give them another 2–3 minutes.
Can I use a different apple variety?
Yes. The two key qualities are firmness (so they hold their shape) and balanced sweet-tart flavor. Granny Smith, Honeycrisp, Pink Lady, Braeburn, Jonagold, and Cosmic Crisp all work beautifully. Avoid mealy varieties like Red Delicious, and very soft cooking apples like McIntosh.
Final Thoughts
If your kids (or you) grew up with the foil-wrapped, cardboard-flavored kind, this apple cinnamon pop tarts recipe is going to ruin them for the boxed version forever — in the best possible way. Buttery flake, real cooked apples, a glaze that actually tastes like something. They take an afternoon, but you can stash them in the freezer and have homemade breakfast pastry on tap for weeks.
I’d love to hear how they turn out — if you make this apple cinnamon pop tarts recipe, leave a comment below or tag me on Instagram so I can see. Happy baking, lovelies.