
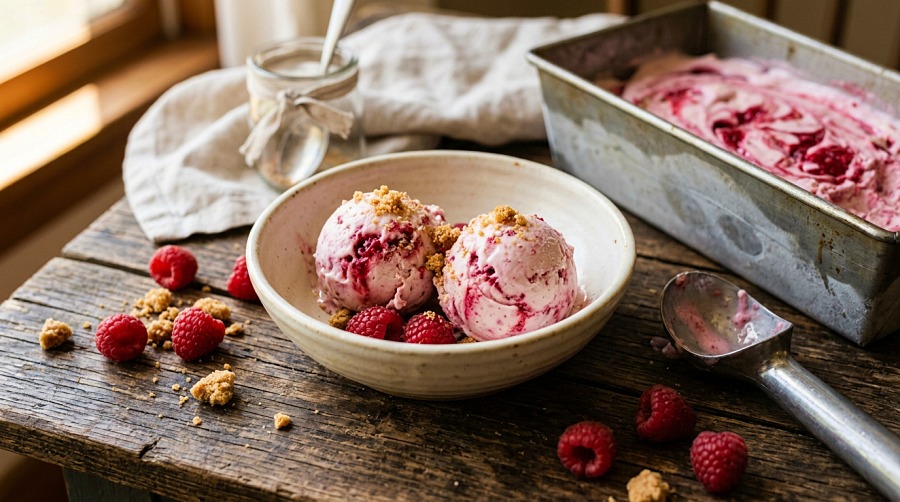
I have a confession that anyone who has read this blog already knows: I am a little obsessed with jam. I will eat it on toast, on scones, straight off the spoon, no judgment please. So when a jar of beautiful homemade raspberry jam landed on my counter a few summers ago, I did what any reasonable person would do. I ate half of it standing at the fridge, then turned the rest into this no churn raspberry ice cream with a buttery crisp swirl folded right through it.
This is the kind of dessert that ruins your willpower. You make it to share, and then you find yourself eating it straight out of the pan with a very large spoon, pretending the freezer trip in between counts as restraint. It does not. But it is so creamy, so tart and sweet at the same time, that I have made my peace with it.
The best part is that this no churn raspberry ice cream takes about five minutes of real work and zero special equipment. No custard to cook, no eggs to temper, no ice cream maker taking up half a cupboard. Just whip, fold, swirl, and freeze.
No churn raspberry ice cream is a homemade frozen dessert made without an ice cream maker. You whip cold heavy cream to stiff peaks, fold in sweetened condensed milk and vanilla, then swirl in raspberry sauce and a buttery baked crumble. Freeze for six hours or overnight until firm and scoopable.
Table of Contents
At a Glance: No Churn Raspberry Crisp Ice Cream Recipe
| Detail | |
|---|---|
| Prep | 20 minutes |
| Cook | 12 minutes (crumble + sauce) |
| Total | 32 minutes active, plus 6 hours freezing |
| Servings | 8 |
| Difficulty | Easy |
| Approx. calories | 420 per serving |
| Cuisine | American |
By the end of this post you will have the full recipe, the food science behind why no-churn works, a foolproof crisp crumble that stays crunchy, plenty of flavor variations, and the storage tricks that keep your ice cream creamy instead of icy.
Why This No Churn Raspberry Ice Cream Works
There is a real reason no-churn ice cream comes out creamy instead of like a frozen brick, and it comes down to two ingredients doing two different jobs.
Whipped heavy cream brings the air. A traditional churn slowly works air into the base as it freezes, which is what gives ice cream its soft, scoopable body. When you whip cold cream to stiff peaks, you are folding all that air in by hand before it ever hits the freezer. That trapped air is the whole trick.
Sweetened condensed milk fights the ice. Condensed milk is just milk with about 60 percent of the water cooked out and a lot of sugar added back in. That high sugar content lowers the freezing point of the base, so fewer large ice crystals can form. One ingredient handles the texture physically, the other handles it chemically, and together they get you something genuinely close to churned ice cream. You can read more about raspberries and their nutrition over at USDA FoodData Central.
It also happens to be eggless, which means there is no raw egg to worry about and no chilling the base for hours before you freeze it. You can go from bowl to freezer in one sitting.
Ingredients and Notes
This recipe has three little parts, and none of them are hard. Here is everything, with honest notes on what you can swap.
For the crisp crumble
- 1/2 cup all-purpose flour
- 1/3 cup old-fashioned rolled oats — these give the crumble that proper crisp texture. Quick oats work but turn a little softer.
- 1/3 cup packed brown sugar — light or dark, dark gives a deeper caramel note
- 1/4 teaspoon ground cinnamon
- Pinch of fine salt
- 4 tablespoons cold unsalted butter, cubed
For the raspberry swirl
- 1 1/2 cups fresh or frozen raspberries
- 2 tablespoons granulated sugar
- 1 teaspoon lemon juice — brightens the berries and keeps the swirl from tasting flat
Shortcut: Skip the sauce and use 1/2 to 2/3 cup of good thick raspberry jam instead. This is honestly how the recipe was born for me, with a jar of someone else’s gorgeous homemade jam. It works beautifully and saves you a step. Just know the swirl will be sweeter and a touch firmer than a fresh sauce.
For the no-churn base
- 2 cups cold heavy whipping cream — it must be heavy cream or heavy whipping cream at 36 percent fat or higher. Half-and-half will not whip thick enough, and milk will not work at all.
- 1 (14 ounce) can sweetened condensed milk — not evaporated milk. They look similar on the shelf and behave completely differently. Evaporated milk has no added sugar and will give you an icy mess.
- 2 teaspoons pure vanilla extract
- Pinch of fine salt — sounds odd in ice cream, but it sharpens the raspberry and rounds out the sweetness
Equipment You Need
- Hand mixer or stand mixer with whisk attachment
- Small saucepan and a fine-mesh sieve (only if you make fresh sauce)
- Baking sheet for the crumble
- A 9 by 5 inch loaf pan
- Parchment paper and plastic wrap
- A flexible spatula and a butter knife for swirling
How to Make No Churn Raspberry Ice Cream
Step 1: Bake the crisp crumble
Heat your oven to 350°F (175°C). In a bowl, stir together the flour, oats, brown sugar, cinnamon, and salt. Add the cold cubed butter and rub it in with your fingertips until the mixture clumps into pebbly, sandy crumbs. Spread it on a parchment-lined baking sheet and bake for 10 to 12 minutes, until golden and fragrant. Let it cool completely. It will crisp up as it cools, which is exactly what you want.
Step 2: Make the raspberry sauce
Put the raspberries, granulated sugar, and lemon juice in a small saucepan over low heat. Cook for 5 to 8 minutes, stirring and gently mashing the berries with a spoon, until they break down into a loose sauce. For a smooth swirl with no seeds, push it through a fine-mesh sieve. I usually leave a few seeds in because I like the texture, but that is your call. Cool it completely before using, ideally in the fridge. A warm sauce will melt your base.
Step 3: Whip the cream
Pour the cold heavy cream into a large, cold bowl. Whip on medium-high until stiff peaks form, about 2 to 4 minutes. Stiff peaks means the cream holds its shape and the peak stands up when you lift the beater. Stop there. If it looks grainy or starts to separate, you have gone too far.
Step 4: Build the base
Add the sweetened condensed milk, vanilla, and pinch of salt directly to the whipped cream. Fold gently with a spatula until just combined and no streaks of condensed milk remain. Fold, do not stir. You are trying to keep all that air you just whipped in. The base should look thick, smooth, and pillowy.
Step 5: Layer and swirl
Spoon about a third of the base into your loaf pan. Drop spoonfuls of raspberry sauce over it, scatter on a handful of crumble, and drag a butter knife through to swirl. Repeat with the next third of base, more sauce, more crumble, more swirling, then finish with the last of the base and a final swirl on top. Reserve a small handful of crumble to sprinkle on right before serving so it stays crunchy.
Step 6: Freeze
Press a piece of plastic wrap directly onto the surface of the ice cream. This stops ice crystals and freezer smells from creeping in. Freeze for at least 6 hours, or overnight for the firmest scoop. Let it sit on the counter for about 10 minutes before scooping so it softens to that perfect creamy texture.
Pro Tips From My Kitchen
- Start cold, stay cold. Cream whips faster and holds more air when it is straight out of the fridge. I chill the bowl and beaters in the freezer for 10 minutes first. It makes a real difference.
- Do not oversaturate with sauce. It is tempting to dump in extra raspberry, but too much liquid means more ice crystals and a harder, iceier scoop. Stick to the amount and swirl rather than mix.
- Keep some crumble back. The crumble folded inside softens slightly over time in the freezer, which is lovely, but I always save a little to sprinkle on top fresh. The contrast of crunchy crumble against creamy ice cream is the whole point.
- Swirl, never stir. Three or four passes with a knife gives you those gorgeous ribbons. Keep going and you will just have uniformly pink ice cream, which still tastes great but loses the marbled look.
- Taste your base before freezing. This is the only time you can fix the sweetness or vanilla. Once it is frozen, what you have is what you get.
Flavor Variations
This base is endlessly forgiving, so once you have the method down you can run with it.
- Blueberry crisp: Swap the raspberries for blueberries and a squeeze of lemon. It turns the swirl a deep purple and tastes like blueberry pie.
- Peach and cream: Use a peach swirl instead of raspberry. Peaches and cream in frozen form is exactly as good as it sounds, and it might be my favorite version.
- Strawberry: Strawberries make a softer, sweeter swirl. Cook them down a little longer since they hold more water.
- Graham cracker crisp: Replace the oat crumble with crushed graham crackers tossed in melted butter and brown sugar for a cheesecake-leaning vibe.
- White chocolate raspberry: Drizzle melted white chocolate over the base as you layer. It sets into thin shards in the freezer.
If you love the raspberry-and-cream combination as much as I do, you will probably also want my raspberry jam filled donuts and these blueberries and cream pastry puffs.
Storage, Make-Ahead, and Freezer Notes
This is a make-ahead dream, since it has to freeze anyway. Make it a day or two before you need it and you are set.
For the best texture, eat your no churn raspberry ice cream within two weeks. Homemade ice cream has no commercial stabilizers, so it can keep for up to about a month if stored well, but the texture and flavor are at their peak in that first week or two. After that it slowly turns icier.
To store it right:
- Keep it in an airtight container, or keep the loaf pan tightly wrapped.
- Press plastic wrap or parchment directly onto the surface before sealing the lid. This is the single biggest thing for preventing ice crystals.
- Store it at the back of the freezer where the temperature is most stable, not in the door. Aim for 0°F (-18°C) or colder. The FDA’s safe food storage guidance is a good reference for keeping your freezer in the right range.
- Do not let it fully melt and refreeze. The crystals reform larger and you lose that creamy body.
If the crumble inside softens after a few days, just add a sprinkle of fresh crumble on top when you serve. I often bake a double batch of crumble and keep the extra in a jar for exactly this.
Serving Suggestions
Honestly, a big spoon and the pan is a valid serving suggestion in my house. But if you want to be a little more put together:
- Scoop it over a warm fruit crisp or cobbler for a double dose of that crumble-and-berry thing.
- Sandwich it between two cookies for an upgrade on my chocolate dipped oatmeal ice cream sandwiches.
- Serve small scoops alongside other no-bake treats from my easy three ingredient desserts for a summer dessert spread.
- Top with extra fresh raspberries and a drizzle of the leftover raspberry sauce.
Frequently Asked Questions
Can I make raspberry ice cream without an ice cream maker?
Yes, and that is the whole point of this recipe. The combination of whipped heavy cream and sweetened condensed milk does the job a churn normally does. The cream adds air, the condensed milk keeps it from freezing solid, so you get a creamy scoop with no machine at all.
Can I use frozen raspberries?
Absolutely. Frozen raspberries are often cheaper and just as good for the sauce. There is no need to thaw them first, just add them to the saucepan a little colder and cook for an extra minute or two until they break down.
Can I use raspberry jam instead of making sauce?
Yes, and it is a great shortcut. Use 1/2 to 2/3 cup of good thick raspberry jam in place of the cooked sauce. The swirl will be a bit sweeter and slightly firmer once frozen, but it works beautifully. This is genuinely how I first made it.
Why is my no churn ice cream icy or hard?
Usually one of three things. Either too much liquid got swirled in (extra sauce means extra ice crystals), the cream was underwhipped so not enough air went in, or evaporated milk got used instead of sweetened condensed milk. Stick to stiff peaks, the right amount of sauce, and real sweetened condensed milk, and you will get a creamy result.
Can I make this without sweetened condensed milk?
Not really, not with this method. Sweetened condensed milk replaces the cooked custard base in traditional ice cream and provides the sugar that keeps it scoopable. Without it you would need a different recipe entirely. Coconut condensed milk is the one substitute that works if you want a dairy-free version, paired with coconut cream instead of heavy cream.
How do I keep the crisp crumble crunchy?
The crumble folded inside will soften slightly over time, which many people love. To keep real crunch, hold back a portion of baked crumble and sprinkle it over each scoop just before serving. Stored in a sealed jar, the extra crumble stays crisp for a week.
How far ahead can I make it?
Make it up to two weeks ahead for best quality. It actually needs at least 6 hours in the freezer to set, so a day or two ahead is ideal for a party. Just remember to soften it on the counter for about 10 minutes before scooping.
A Final Scoop
If you only make one frozen treat this summer, let it be this no churn raspberry ice cream. It is creamy, it is tart, it has that buttery crisp swirl running through every bite, and it asks almost nothing of you in return. No machine, no custard, no fuss, just a handful of ingredients and a few hours of patience. The hardest part really is waiting for it to freeze, and then convincing yourself to put the spoon down.
If you make this, I would love to hear how it went. Leave a rating and a comment below, tell me which swirl you tried, and save it to Pinterest so you can find it again on the next hot day in September.