
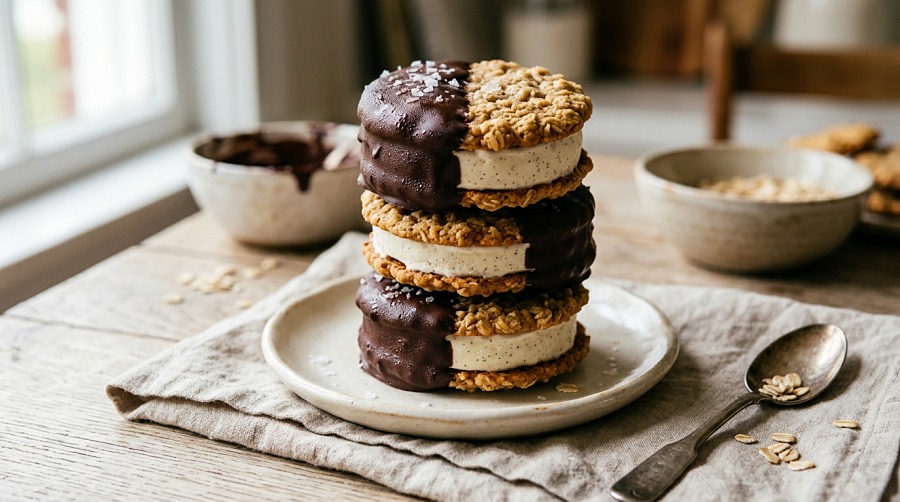
Ice cream sandwiches were always my weakness as a kid. When the truck rolled around the corner with that tinny little song playing, I never even looked at the popsicles — it was straight to the cookie-and-ice-cream window every time. These chocolate dipped oatmeal ice cream sandwiches are everything that childhood memory promised, only better: vanilla bean ice cream packed between two thick, chewy homemade oatmeal cookies, half-dunked in dark chocolate that snaps when you bite through it.
The recipe started as a collaboration I did for The Feedfeed years ago, and I’ve quietly tweaked it every summer since. The version below is the one I actually make now — with a half-butter-half-oil cookie trick that keeps everything soft straight from the freezer.
Chocolate dipped oatmeal ice cream sandwiches are made by sandwiching softened vanilla ice cream between two chewy oatmeal cookies, freezing the assembled sandwiches until firm (at least 4 hours), then dipping them halfway in melted dark chocolate thinned with coconut oil. The coconut oil creates a thin chocolate shell that hardens instantly on the cold sandwich, giving you that magic-shell crackle without anything fancy. Total active time is about 45 minutes; the rest is freezing.
| Detail | |
|---|---|
| Prep time | 25 minutes |
| Cook time | 12 minutes |
| Freeze time | 4–6 hours (or overnight) |
| Total time | ~5 hours |
| Servings | 10 sandwiches |
| Difficulty | Easy–Intermediate |
| Approx. calories | 380 per sandwich |
| Cuisine | American |
Below you’ll find the exact cookie ratio that stays chewy in the freezer, the chocolate shell technique that won’t melt your ice cream on contact, a full set of make-ahead notes, and the variations I’ve actually tested (including the brown-butter and caramel upgrades).
Table of Contents
Why This Chocolate Dipped Oatmeal Ice Cream Sandwiches Recipe Works
The thing nobody tells you about homemade ice cream sandwiches is that most oatmeal cookies turn into hockey pucks in the freezer. Butter solidifies completely below 32°F, and standard cookie ratios go rock-hard the second they hit the freezer.
This recipe fixes that three ways. First, I swap half the butter for a neutral oil — oil stays liquid at freezer temperatures, which keeps the cookie tender. Second, the dough leans heavily on brown sugar instead of granulated; sugar lowers the freezing point of baked goods, so the cookie stays soft to bite. Third, a single tablespoon of water hydrates the oats and keeps the crumb chewy through hours in the freezer. That trio is the difference between a cookie that snaps your jaw and one that gives way the moment you bite in.
The chocolate shell is the other half of the magic. Pure melted chocolate cracks off cleanly because it’s brittle when frozen — which sounds nice but means a messy fall-apart on the first bite. Adding refined coconut oil to the chocolate keeps the shell thin and snappy without shattering. It’s the same trick behind store-bought magic shell, minus the additives.
A quick note on the It’s-It connection
If you’ve ever spent a summer on the West Coast, you’ve probably had an It’s-It, the iconic San Francisco ice cream sandwich invented by George Whitney in 1928 at the original Playland-at-the-Beach amusement park near Ocean Beach. The combination — oatmeal cookies, vanilla ice cream, chocolate coating — is the same one I’ve been making at home for years. This recipe is my homage to that original, with a chewy cookie that doesn’t try to mimic the firm factory version. It’s softer, more rustic, and meant to taste homemade.
Ingredients You’ll Need
For the chewy oatmeal cookies
- 1/2 cup (113 g) unsalted butter, melted and slightly cooled — for flavor and richness
- 1/4 cup (60 ml) neutral oil (canola, sunflower, or light olive) — keeps the cookies soft from the freezer; this is non-negotiable, no full-butter substitute will give the same texture
- 1 cup (200 g) light brown sugar, packed — the moisture and depth here matter; do not swap with white sugar
- 1/4 cup (50 g) granulated sugar
- 1 large egg, room temperature
- 1 tablespoon water
- 1 1/2 teaspoons pure vanilla extract
- 1 cup (125 g) all-purpose flour
- 1/2 teaspoon baking soda
- 3/4 teaspoon ground cinnamon
- 1/2 teaspoon fine sea salt
- 1 3/4 cups (165 g) old-fashioned rolled oats — old-fashioned, not quick or steel-cut; the larger flakes hold their texture
For the assembly
- 3 cups (about 1.5 pints) vanilla bean ice cream, slightly softened — premium brands like Häagen-Dazs or a quality local creamery hold up better than budget brands, which contain more air and refreeze grainy
For the chocolate shell
- 8 oz (225 g) good-quality dark chocolate (60–70% cacao), chopped, or high-quality chocolate chips
- 2 tablespoons refined coconut oil (not virgin — refined has no coconut flavor and a cleaner melt)
- Flaky sea salt, optional, for finishing
Substitute notes (honest version): You can use semi-sweet chocolate chips with no real loss. You can swap refined coconut oil with neutral oil at a 1:1 ratio in a pinch, but the shell will be slightly tackier and won’t snap as crisply — coconut oil is genuinely better here. Skipping the oil entirely will give you a thicker chocolate that cracks awkwardly when bitten; not recommended.
Equipment
Nothing exotic — a sheet pan, parchment paper, a medium mixing bowl, a whisk, a 1.5-tablespoon cookie scoop, an offset spatula, and a small narrow bowl or measuring cup for dipping. A bench scraper makes the ice cream step neater but isn’t essential.
Step-by-Step Instructions
1. Make the cookies
Preheat the oven to 350°F (175°C). Line two sheet pans with parchment paper.
In a large bowl, whisk together the melted butter, oil, brown sugar, and granulated sugar until smooth and slightly glossy, about 30 seconds. The mixture should look like wet sand pulled together. Whisk in the egg, water, and vanilla until fully combined.
In a separate bowl, whisk the flour, baking soda, cinnamon, and salt together. Add the dry ingredients to the wet and stir with a wooden spoon or spatula until just combined — you should still see a few streaks of flour. Add the oats and fold gently until evenly distributed. The dough will look soft and a little loose. Chill it for 15 minutes if your kitchen is warm.
2. Scoop and bake
Using a 1.5-tablespoon cookie scoop (about 35 g per cookie), portion 20 dough balls onto the prepared sheet pans, leaving 2 inches between each. Press each ball down very gently with your palm — just enough to flatten the top. This helps the cookies spread evenly into discs you can stack.
Bake for 10 to 12 minutes, until the edges are set and lightly golden but the centers still look slightly underdone — they’ll firm up as they cool, and you want them on the softer side. Let the cookies rest on the pan for 5 minutes, then transfer to a wire rack to cool completely. Don’t skip the full cool — even faintly warm cookies will melt your ice cream on contact.
Once cool, transfer the cookies to the freezer for at least 20 minutes. Cold cookies sandwich neatly without smashing the ice cream.
3. Assemble the sandwiches
Pull the ice cream from the freezer and let it sit on the counter for 5 to 8 minutes, just until scoopable but not melty. Set up an assembly line: parchment-lined sheet pan, frozen cookies, ice cream, offset spatula.
Flip ten cookies upside down on the pan. Scoop about 1/4 cup of ice cream onto each, then top with a second cookie, flat side down, and gently press until the ice cream spreads to the edges. Use the spatula or a butter knife to smooth the edges flush.
Work quickly — once you’ve assembled three or four, slide the pan into the freezer for 5 minutes if the ice cream is starting to soften, then come back to it. Freeze the assembled sandwiches for at least 2 hours, ideally overnight, before dipping.
4. Make the chocolate shell
Combine the chopped chocolate and coconut oil in a microwave-safe bowl. Heat in 20-second bursts at medium power, stirring well between each, until smooth and fully melted. The mixture should be pourable but not hot — let it cool to just barely warm to the touch (about 90°F if you have a thermometer). Too hot, and it will melt the ice cream the second it touches the sandwich; too cool, and it will seize and clump.
Transfer the melted chocolate to a small, deep bowl or a tall measuring cup — narrow vessels give you better dip depth than wide ones.
5. Dip and finish
Line a clean sheet pan with parchment. Pull the frozen sandwiches out one at a time. Holding the cookie firmly, dip half of each sandwich into the chocolate at a 45-degree angle, letting the excess drip back into the bowl for a few seconds.
Set the dipped sandwich back on the parchment-lined pan. If using flaky sea salt, sprinkle it on the chocolate immediately, before it sets. The chocolate will harden in about 30 seconds on contact with the frozen sandwich.
Return the dipped sandwiches to the freezer for at least 30 minutes to fully set before serving.
Pro Tips From Years of Making These
- Brown the butter for a flavor upgrade. If you have an extra 10 minutes, melt the butter in a small saucepan over medium heat, swirling, until the milk solids turn golden brown and smell nutty. Let it cool to room temperature before using. The cookies will taste richer and more caramel-y. Don’t reduce the oil amount; you still need it for the freezer-friendly texture.
- Salt is your friend, twice. The half-teaspoon of fine sea salt in the dough balances the sweetness; the flaky salt on top of the chocolate makes the whole thing taste more grown-up and less candy-bar.
- Let the sandwich temper before eating. Pull a sandwich from the freezer 3 to 5 minutes before serving. The cookie softens slightly, the ice cream loses its frozen edge, and the chocolate is at its peak crackle. Straight-from-the-freezer is too cold to taste properly.
- Don’t try to dip the whole sandwich. Half-dipping isn’t just aesthetic — a fully-coated sandwich is a nightmare to hold. The bare cookie half is your handle.
- Premium ice cream genuinely matters here. Budget ice cream is whipped with more air, so it melts faster during assembly and refreezes with ice crystals. Spend the extra $2 for a quality pint.
Variations Worth Making
Caramel layer. Smear a thin layer of thick caramel or dulce de leche on the bottom cookie before adding the ice cream. Trim to keep it neat. Adds messiness, adds flavor — worth it.
Brown-butter espresso. Brown the butter as described, and add 1 teaspoon instant espresso powder to the chocolate shell. The espresso amplifies the chocolate without making it taste like coffee.
Different ice creams. Salted caramel, coffee, mint chip, and strawberry all work beautifully. Black raspberry is my personal favorite if you want something a little less expected.
Coated edges. Roll the exposed ice cream edges in sprinkles, crushed toffee, mini chocolate chips, or chopped toasted nuts before the final freeze. Press lightly so they stick.
Slab method. If individual scooping intimidates you, press the cookie dough into a parchment-lined 9×13 pan in two thin layers, bake, cool, then slab the ice cream between them and cut into rectangles. It’s the Flouring Kitchen approach and works well — but you lose the round cookie aesthetic.
Storage and Make-Ahead
Once the chocolate has set fully (about 30 minutes in the freezer), wrap each sandwich individually in plastic wrap or parchment, then store in an airtight freezer bag or container. They’ll keep for up to 3 weeks with no real quality loss. Past that, the ice cream starts to develop ice crystals and the cookies pick up freezer smells — still edible, just not as good.
To make ahead: Bake the cookies up to 3 days in advance and store at room temperature in an airtight container. Assemble and dip on the day you want to serve, or freeze fully assembled and dipped up to 3 weeks ahead. They’re an ideal party dessert because everything happens before guests arrive.
Don’t refrigerate them — only freeze. Refrigerator temperatures aren’t cold enough to keep the ice cream firm, and the cookies will go from chewy to soggy fast.
Serving Suggestions
These are a complete dessert on their own, but if you want to push them further:
- Serve with a small pour of espresso on the side — the bitter coffee against the cold chocolate is excellent
- Pair with a glass of cold milk for a deliberately childlike moment
- Cut them in half and serve on a platter as part of a summer dessert spread — they pair well with a no-bake summer cheesecake and a bowl of fresh berries
- For a birthday, stack them in a tower with candles pressed into the top sandwich
Looking for more cookie recipes to round out a dessert table? My soft and chewy easy chocolate chip cookies and these wildly popular peanut butter chunker cookies are both great candidates for ice cream sandwich treatments — same chocolate-dip technique, different flavor profile.
Frequently Asked Questions
Why do my oatmeal cookies turn rock-hard in the freezer?
Because most oatmeal cookie recipes use 100% butter, which solidifies completely below 32°F. The fix is to replace some of the butter with a neutral oil (which stays liquid in the freezer) and lean heavily on brown sugar, which lowers the freezing point of the cookie crumb. That’s the entire science behind this recipe’s freezer-friendly texture.
Can I use store-bought oatmeal cookies?
Yes, but choose carefully. Thin, soft, slightly underbaked cookies work — think Tate’s Bake Shop oatmeal raisin or a fresh bakery cookie. Avoid crisp, snappy cookies (like a Nature Valley granola-style biscuit); they’ll shatter the moment you bite into a frozen sandwich. If using store-bought, you can skip directly to the assembly step.
How long do chocolate dipped oatmeal ice cream sandwiches last in the freezer?
Up to 3 weeks at peak quality if individually wrapped and stored in an airtight container. Technically safe for longer, but ice crystals and absorbed freezer odors will start to dull the flavor after that.
Can I skip the chocolate dip?
You can, and the plain ice cream sandwich is still excellent. But the chocolate shell does two things that are hard to give up: it adds a textural snap that contrasts the soft cookie, and it acts as an insulator that slows the ice cream’s melt when you’re actually eating it on a hot day. If you’re doing a quick weeknight version, skip it. For company, dip them.
Why is my chocolate shell cracking and falling off?
Two likely causes. First, you may not have used coconut oil (or used too little) — the oil keeps the shell flexible enough to bite through cleanly. Second, the chocolate may have been too thick when you dipped; reheat briefly and add another teaspoon of coconut oil to thin it. A perfect shell should be thin enough that it crackles but stays attached to the cookie.
Can I make these dairy-free or vegan?
Yes. Use a quality vegan butter stick (not tub-style, which has too much water) for the cookies, swap the egg for a flax egg (1 tablespoon ground flax + 2.5 tablespoons water), and use any good dairy-free ice cream and dairy-free dark chocolate. The texture is nearly identical; flavor is slightly less rich.
What’s the best ice cream to use?
A premium vanilla bean (Häagen-Dazs, Tillamook, or a local creamery) is my default — it has enough fat to refreeze smoothly without ice crystals. Avoid budget ice cream brands that are whipped with extra air. If you want to go beyond vanilla, mint chocolate chip and coffee are the next two I reach for.
Do I need to chill the cookies before assembling?
Yes — really. Room-temperature cookies will melt the ice cream the second they touch it, and you’ll end up with a soupy mess that refreezes lopsided. A 20-minute freezer trip for the cookies fixes everything.
A Last Note
Every summer I make a batch of these chocolate dipped oatmeal ice cream sandwiches the first weekend the heat actually settles in, and they disappear within 48 hours every single time. They’re nostalgic without being precious, easy enough for a weeknight, and impressive enough to serve at a backyard cookout in September. The half-butter, half-oil cookie trick is genuinely the difference-maker — once you taste a chewy oatmeal cookie that survives the freezer, you can’t go back to the rock-hard kind.
If you make a batch, I’d love to hear how it goes — leave a rating and comment below, especially if you try one of the variations. And save this one to Pinterest for the next time the temperature hits 90°F.
Happy baking.