
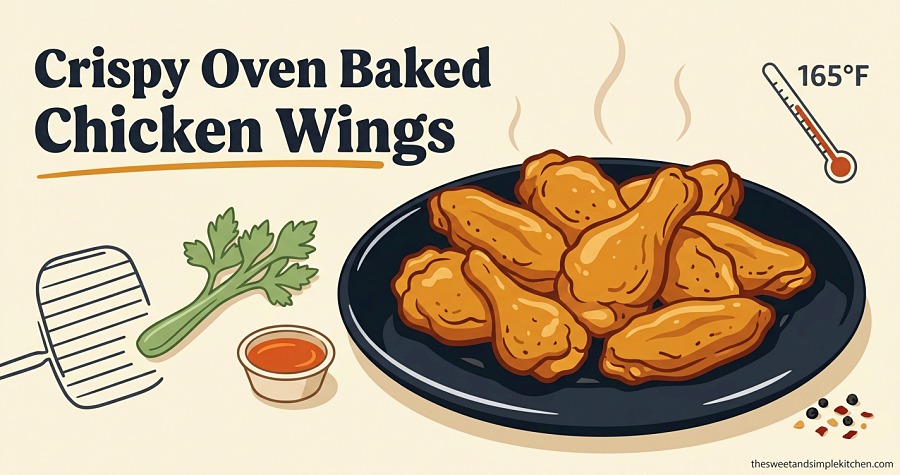
There are two kinds of baked chicken wings in this world: the soggy, pale, sad ones — and the kind that crackle when you bite into them and somehow stay juicy underneath. After making these almost weekly through every football season since I started this kitchen, I can tell you the difference between them is not luck. It’s three or four small choices, made on purpose.
This is the oven baked chicken wings recipe I make for game day, weeknight dinners, and any time someone in my house asks “can we have wings?” — which is most weeks. No deep-frying, no sad steamed skin, no recipe-blog filler.
Table of Contents
How to Bake Chicken Wings (Crispy)
To make crispy oven baked chicken wings, pat 2 lbs of wings completely dry, toss them with 1 tablespoon aluminum-free baking powder and your seasoning, then bake on a wire rack at 425°F for 40–45 minutes, flipping once, until the internal temperature hits at least 165°F. The baking powder pulls moisture out of the skin and raises its pH, giving you that fried-style crunch without any oil.
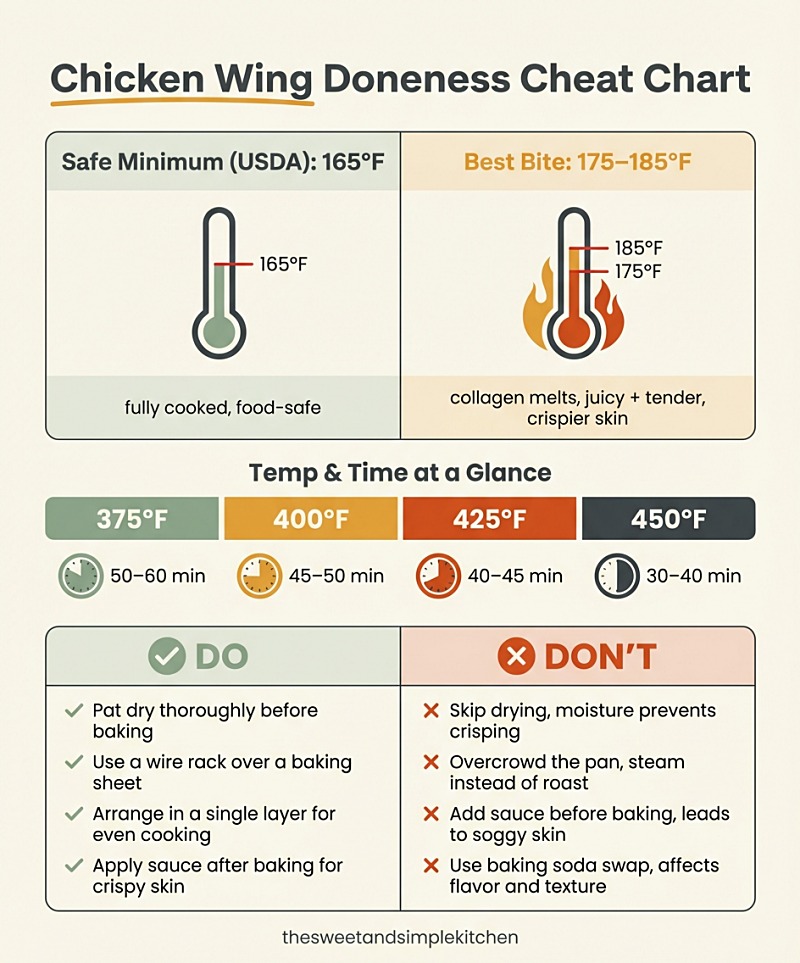
Trust note: Per the USDA Food Safety and Inspection Service, all chicken wings need to reach an internal temperature of 165°F at the thickest part. For best texture though, most pitmasters and recipe testers push wings to 175–185°F because the connective tissue melts and the skin crisps harder.
Quick-Glance Baked Chicken Wings Recipe Card
| Prep time | 10 minutes |
| Cook time | 40–50 minutes |
| Total time | About 1 hour |
| Servings | 4 (about 2 lbs of wings) |
| Oven temp | 425°F (220°C) |
| Internal temp target | 165°F minimum, 175–185°F for best texture |
| Difficulty | Easy — no special skills needed |
Why This Oven Baked Chicken Wings Recipe Works (The Quick Science)
Most “crispy baked wings” recipes online give you the technique but skip the why, which is why people end up troubleshooting in the comments. Here’s the short version.
Chicken skin is mostly water, fat, and protein. To get crunch, you need to drive the water out and brown the proteins. Baking powder helps with both jobs. The baking powder and salt help break down the proteins in the skin, draw moisture to the surface, and also aid in browning. The alkalinity raises the skin’s pH, which speeds up the Maillard reaction — the same reaction that browns a steak crust — and the leavening creates micro-bubbles in the skin that bake into a thin, glassy crust.
That’s it. The rest is just temperature, time, and not crowding the pan.
Ingredients
You only need pantry stuff. No buttermilk soak, no overnight brine (though I’ll tell you about a great optional one further down).
- 2 lbs chicken wings (about 16–20 pieces — drumettes and flats, “party cut”)
- 1 tablespoon aluminum-free baking powder (this is non-negotiable — see notes below)
- 1 teaspoon kosher salt (or ½ tsp fine sea salt)
- 1 teaspoon garlic powder
- 1 teaspoon smoked paprika (regular paprika works too)
- ½ teaspoon onion powder
- ½ teaspoon freshly cracked black pepper
- Optional: ¼ teaspoon cayenne for heat, or a pinch of brown sugar for color
A Note on Baking Powder
It absolutely has to be aluminum-free baking powder. Brands like Rumford or Bob’s Red Mill work great. The aluminum-based ones leave a metallic, almost soapy aftertaste that nothing can rescue. And do not swap baking soda for baking powder. Baking soda is much more alkaline and will make the wings taste off and slightly bitter. I have tried both, separately, on bad days. Stick with the powder.
Equipment You’ll Need
- A rimmed half-sheet pan (about 13×18 inches)
- An oven-safe wire cooling rack that fits inside the pan
- Aluminum foil or parchment paper (for easy cleanup under the rack)
- Paper towels (lots — drying matters)
- An instant-read thermometer (any cheap digital one works)
- A large mixing bowl
If you don’t own a wire rack, no panic — you can bake the wings directly on a parchment-lined sheet pan. You’ll just need to flip them. I’ll cover both methods.
How to Bake Chicken Wings: Step-by-Step
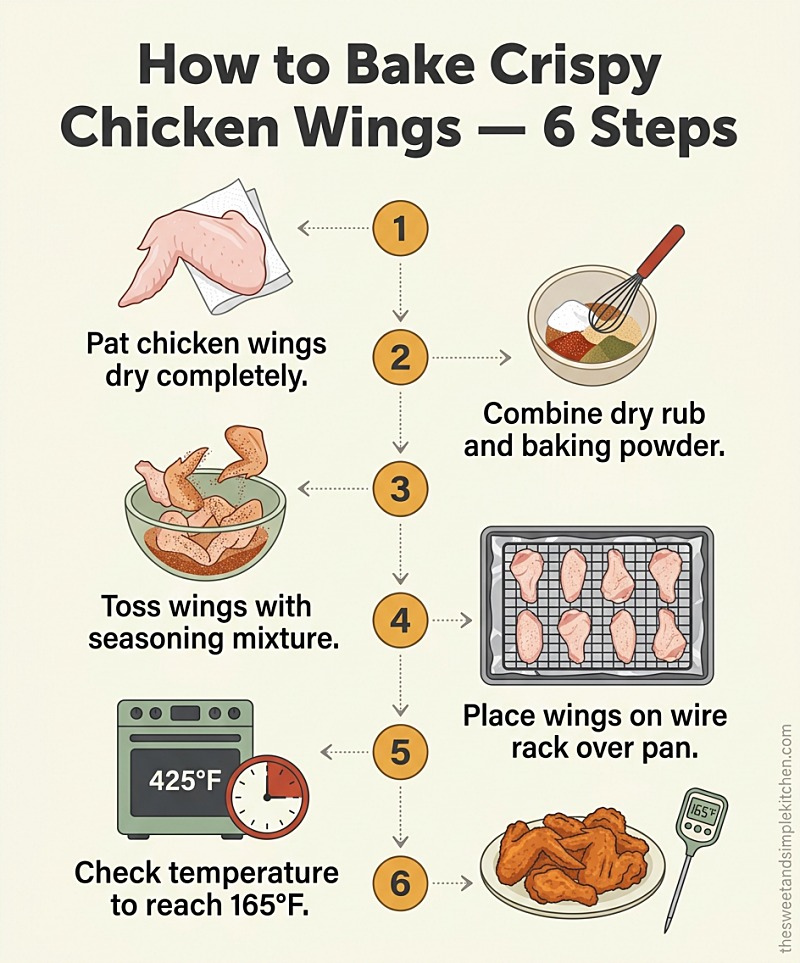
Step 1 — Pat the wings really, really dry
Take the wings out of the package, lay them on a stack of paper towels, and blot. Then flip and blot again. Then do it one more time. Surface moisture is the single biggest killer of crispy skin — water has to evaporate before browning begins, and every drop you leave on the wings is just slowing you down.
If you have time, lay the wings on a wire rack and let them sit uncovered in the fridge for 1–8 hours. The cold, dry air will pull even more moisture from the skin. This is the closest thing to a “secret” pros use.
Step 2 — Preheat the oven and prep the pan
Heat the oven to 425°F. Position the rack in the upper-middle slot — close enough to the top heating element to brown the skin, but not so close it scorches.
Line your sheet pan with foil (this is purely for cleanup; you’ll thank yourself later). Set the wire rack on top and give it a light spray of neutral oil so the wings don’t stick.
Step 3 — Toss with baking powder and seasoning
In a large bowl, whisk together the baking powder, salt, garlic powder, smoked paprika, onion powder, and pepper. Add the dried wings and toss with your hands until every piece is evenly coated. The coating should look like a light, almost invisible dusting — not clumpy.
Pro tip: If your seasoning is clumping, your wings aren’t dry enough. Blot again before tossing.
Step 4 — Arrange in a single layer
Place the wings on the wire rack, skin side up, with at least half an inch of space around each one. Crowding traps steam, and steam means soggy skin. Use two pans if you need to.
Step 5 — Bake for 40–45 minutes, flipping once
Bake at 425°F for 25 minutes, then flip each wing with tongs and bake for another 15–20 minutes, until the skin is deep golden, blistered in spots, and crackly when tapped.
If you’re not using a wire rack, flip more often — every 15 minutes or so — to keep one side from steaming against the pan.
Step 6 — Check temperature, rest, and serve
Insert your instant-read thermometer into the thickest part of the meat (avoid the bone). You’re looking for at least 165°F. For the best texture, push them to 175–180°F — the meat will still be juicy because wings are dark meat, and the connective tissue will have melted into the skin.
Let the wings rest for 3–5 minutes before saucing or serving. This redistributes juices and keeps the skin from steaming under sauce.
Two-Zone Method (For Even Crispier Skin)
If you want the absolute crispiest result and you don’t mind 20 extra minutes, do this:
- Bake the wings at 250°F on the lowest rack for 30 minutes. This slowly renders the fat under the skin without browning it.
- Bump the oven to 425°F, move the wings to the upper-middle rack, and bake for 40–45 minutes, flipping once.
The low-and-slow first stage is borrowed from a classic Cook’s Illustrated technique. It melts the fat layer that lives between the skin and the meat, so by the time the wings hit high heat, the skin is essentially primed to crisp up like a deep-fryer’s. This is my go-to method when I’m cooking wings for a party rather than weeknight dinner.
Wing-Size Timing Chart
Wing size varies a lot — supermarket party wings are usually medium, but I’ve seen monster jumbo wings that need real time. This chart is what I actually use:
| Wing size | Pieces per pound | Total bake time at 425°F | Notes |
|---|---|---|---|
| Small | 12+ per lb | 35–40 min | Flip at 25 min |
| Medium | 10 per lb | 40–45 min | Flip at 25 min (most common) |
| Large | 8 per lb | 45–55 min | Flip at 30 min |
| Jumbo / whole wings | 5–6 per lb | 55–65 min | Flip at 30 min, may need an extra 5 |
Always confirm with a thermometer — wing size is more reliable than wing weight.
Drumettes vs. Flats — They Don’t Cook the Same
Most people don’t realize this, but drumettes (the part that looks like a mini drumstick) and flats (the two-bone wingette) cook at slightly different rates. Drumettes have more meat packed around a thicker bone, so they need a few extra minutes. Flats have more skin-to-meat ratio, which means they crisp faster but also dry out faster if you forget about them.
My fix: Put the drumettes on the side of the pan closest to the back of the oven (where it’s hottest), and the flats toward the front. If your oven is uneven (most are), you’ll level out the cook time without doing anything fancy.
Sauce Options & The “Sauce After, Always” Rule
The single biggest mistake I see new cooks make is saucing wings before baking. Don’t. The sugar in BBQ sauce burns, the water in buffalo sauce makes everything soggy, and you’ll undo all that crispy work in 30 seconds.
Always sauce after baking. Toss the hot wings in sauce in a big bowl right before serving, or serve the sauce on the side for dipping.
Three Easy Sauce Ratios
| Sauce | Ratio (per 2 lbs of wings) | Notes |
|---|---|---|
| Classic Buffalo | ½ cup Frank’s RedHot + 4 tbsp melted butter + 1 tsp white vinegar | Whisk warm; toss immediately |
| Honey Garlic | ⅓ cup honey + 3 tbsp soy sauce + 4 cloves minced garlic + 1 tbsp butter | Simmer 3 min until syrupy |
| Garlic Parmesan | 4 tbsp melted butter + 3 cloves grated garlic + ⅓ cup grated parm + 1 tbsp parsley | Toss while wings are still hot so cheese melts in |
Dipping Sauces — What People Actually Want
According to the National Chicken Council’s consumer poll, ranch is the runaway favorite — about 59% of U.S. adults who eat chicken wings say they typically like to eat their wings with ranch dressing, followed by buffalo/hot sauce and BBQ tied at 48%, with blue cheese coming in fifth.
So if you’re hosting and you’re going to put one dip on the table, make it ranch. If you’re putting two, add blue cheese for the traditionalists.
Common Mistakes to Avoid
These are the four mistakes I see most often in the comments and in my own early disasters:
- Skipping the dry. If the wings come out of the bag wet and go straight into seasoning, they will not crisp. Period. Blot, blot, blot.
- Using regular baking powder (with aluminum). Tastes metallic. Always read the label.
- Crowding the pan. Even a wire rack can’t save wings that are touching. Use two pans if you have to.
- Saucing before baking. Repeating because it matters: skin first, sauce later.
Storage, Make-Ahead, and Reheating
Storing leftovers: Cool the wings completely, then store them un-sauced in an airtight container in the fridge for up to 4 days.
Reheating without losing crispness:
- Air fryer (best): 375°F for 4–5 minutes
- Oven: 400°F for 8–10 minutes on a wire rack
- Microwave (not great): 60–90 seconds, but the skin will go soft
Make-ahead for a party: You can fully bake the wings up to a day ahead, refrigerate them un-sauced, then reheat at 425°F for 10–15 minutes right before guests arrive. Toss with warm sauce at the very end. This is the only make-ahead method I trust for a crowd.
Freezing: Cool, freeze on a baking sheet until firm, then transfer to a freezer bag for up to 3 months. Reheat from frozen at 400°F for 18–22 minutes.
Nutrition (Per Serving — Plain Baked Wings, No Sauce)
Per UCI Health, the difference between baked and fried wings is real: a typical serving of fried wings — two pieces — will weigh in with 309 calories, 21 grams of fat and more than 1,000 mg of sodium. Baking them chops that down to 162 calories, 4.5 grams of fat and 170 mg of sodium.
Roughly per 4-wing serving (plain baked, with skin):
- Calories: ~280–320
- Protein: ~22–25g
- Fat: ~18–22g
- Carbs: <1g
- Sodium: 350–500mg (varies with seasoning)
Sauces add fast, especially sweet or creamy ones. If you’re tracking, dip on the side rather than tossing.
Pro Tips Most Recipes Skip
A few things I’ve learned the hard way that aren’t in most posts:
- Bring wings to room temp for 20 minutes before baking. Cold-from-the-fridge wings cook unevenly and the skin lags behind the meat.
- Don’t wash raw chicken. Per USDA guidance, washing raw poultry just splashes bacteria around your sink. Pat with paper towels and toss them in the trash.
- A 2-minute broil at the end is gold. When the timer’s up, set the oven to broil and watch the wings for 60–120 seconds. The skin goes from “pretty good” to “shatter-crisp” almost instantly. Don’t walk away.
- Salt the day before, if you can. Even just 4 hours of salt on the skin in the fridge (uncovered) is a noticeable upgrade. It’s a mini dry-brine.
- Save the wing tips. If you’re cutting whole wings yourself, save the tips in a freezer bag — they make incredible chicken stock.
Why Chicken Wings Are The Game-Day Food
Quick context: Americans eat an unreasonable number of wings on Super Bowl weekend. The National Chicken Council projected Americans would eat 1.48 billion chicken wings watching the Patriots and Seahawks battle for the Lombardi Trophy for the most recent Big Game — about 10 million more wings than the year before.
That’s the cultural weight you’re cooking against. Worth doing them right.
Frequently Asked Questions
How long do you bake chicken wings at 425°F?
About 40–45 minutes for medium-sized wings, flipping once at the 25-minute mark. Larger wings may need 50–55 minutes. Always confirm with a thermometer reading at least 165°F at the thickest part of the meat.
Should I bake wings at 400°F or 425°F?
Both work, but 425°F gives a noticeably crispier skin in less time. At 400°F, plan on 45–50 minutes. At 425°F, plan on 40–45. If your oven runs hot, 400°F is a safer bet.
Do I have to flip baked chicken wings?
Only if you’re not using a wire rack. A wire rack lets hot air circulate around the entire wing, so flipping is optional (though I still flip once for insurance). Without a rack, flip every 15–20 minutes so the bottom side doesn’t steam against the pan.
What does baking powder do for chicken wings?
It does two things: it draws moisture out of the skin so the surface dries quickly, and it raises the skin’s pH, which speeds up browning and creates micro-bubbles for that crackly, fried-style texture. Use only aluminum-free baking powder — never baking soda.
What internal temperature should chicken wings be?
The USDA-recommended minimum safe internal temperature for chicken is 165°F, measured at the thickest part of the meat. Wings are forgiving — they can go higher (175–185°F) without drying out, and many cooks prefer that range for tenderness and crispness.
Why aren’t my baked wings crispy?
Three usual suspects, in order of likelihood: (1) the wings weren’t dry enough before seasoning; (2) the pan was overcrowded, trapping steam; (3) the oven temperature was too low. Fix those three and you’ll fix the wings.
Can I bake frozen chicken wings?
You can, but thaw them first for the best texture. If you’re in a hurry, you can bake from frozen at 400°F for about 60 minutes, but the skin won’t crisp as well as thawed wings. Always pat them dry once thawed.
Should I use a wire rack to bake wings?
Yes, if you have one — it lets hot air circulate underneath, so the bottom of the wing crisps just like the top. If you don’t have one, line the pan with parchment, bake skin-side down first, and flip more often.
Can I bake chicken wings without baking powder?
Yes, but they won’t be as crispy. The skin will brown but won’t develop that fried-style crackle. If you skip the baking powder, raise the oven temp to 450°F and add an extra 5 minutes of bake time to compensate.
Should I sauce wings before or after baking?
After. Always after. Sauce before baking and the sugars burn, the moisture softens the skin, and you lose the crisp you worked for. Toss in sauce in the last 30 seconds before serving.
Final Notes
If you make these once and pay attention to the dry-and-don’t-crowd rules, you’ll never order wing delivery again. Save the recipe, tweak the seasoning to your house’s taste, and don’t be precious about the sauce — wings are forgiving as long as the skin is right.
Pin or bookmark this for the next game-day weekend, and if you try it, drop a star rating below. It genuinely helps other readers find recipes that actually work.