
If you’ve ever stood at the stove dodging grease splatters just to end up with bacon that’s burnt at the edges and floppy in the middle — I’m right there with you. After years of weekend brunches and feeding hungry holiday crowds, I gave up the skillet for good. The oven wins. Every. Single. Time.
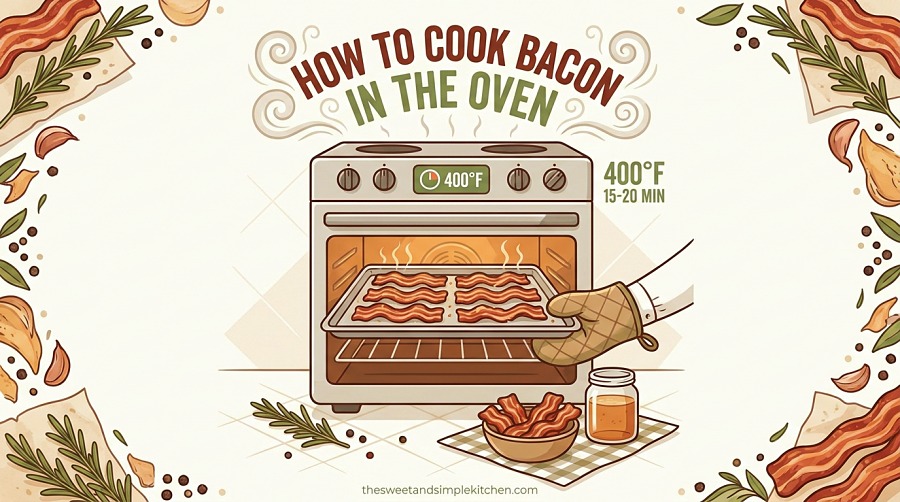
To cook crispy bacon in the oven, line a rimmed baking sheet with parchment or foil, lay the strips in a single layer, and bake at 400°F (204°C) for 14–16 minutes for regular-cut bacon, 18–20 minutes for thick-cut. No flipping required. Drain on paper towels for a final crisp-up. That’s the whole method.
In this guide, I’ll walk you through the exact temperature, timing, and pan setup that gives you golden, shatter-crisp bacon with zero stovetop drama — plus the science of why the oven crisps bacon better, when to use a wire rack, and how to nail thick-cut, thin-cut, peppered, candied, or maple bacon every time.
Table of Contents
At-a-Glance Cheat Sheet
| Bacon Type | Oven Temp | Time | Notes |
|---|---|---|---|
| Thin-cut | 400°F | 12–14 min | Watch closely after 10 min |
| Regular-cut | 400°F | 14–16 min | The sweet spot for most pre-packaged bacon |
| Thick-cut | 400°F | 18–20 min | Add 2–3 min for extra-crisp |
| Thick-cut (cold start) | Set to 425°F | 22–25 min | Renders fat slowly, less curl |
| Turkey bacon | 400°F | 10–12 min | Less fat — dries out fast |
| On a wire rack | 400°F | Add 2–3 min | All-around crispness |
Why Bake Bacon Instead of Frying It?
The oven gives you four things the stovetop can’t:
- Even cooking from all sides — the heat circulates, so every strip browns at the same rate instead of one end crisping while the other stays floppy.
- No grease splatter on your stovetop, walls, or wrists. The fat renders gently into the pan instead of leaping out at you.
- Hands-free cooking — set the timer, walk away, scramble the eggs, brew the coffee.
- Big-batch capacity — one sheet pan holds an entire pound. Two sheet pans can feed a brunch crowd.
There’s a real reason most diners and brunch spots bake their bacon. It’s the only way to turn out a dozen flat, restaurant-style strips at once — straight, crisp, and uniformly golden.
A Quick Bit of Science (Why Bacon Tastes So Good in the Oven)
That irresistible smoky-savory aroma isn’t an accident. It’s the Maillard reaction — a chemical reaction between amino acids and reducing sugars that kicks in around 280–330°F (140–165°C). When you bake bacon at 400°F, the strips spend more time in that flavor-developing temperature window than they do over a hot skillet flame, which is why oven bacon often tastes deeper, richer, and more “bacon-y” than pan-fried bacon. Food scientists have identified more than 150 aroma compounds in cooking bacon, most of them produced as the fat slowly renders and browns. The oven’s gentler, more even heat coaxes them out without scorching.
What You’ll Need
Nothing fancy — most of this is probably already in your kitchen.
Equipment
- One large rimmed baking sheet (a half-sheet pan, around 18×13 inches, fits a full pound)
- Parchment paper or heavy-duty aluminum foil (extra-wide is easier)
- Optional but recommended: an oven-safe wire cooling rack that fits inside the sheet pan
- Tongs (way easier than a fork)
- Paper towels and a plate or platter for draining
- A heat-safe jar or container if you want to save the bacon grease (and you should — more on that below)
Ingredients
- 1 package of bacon (about 12 ounces, or 8–14 slices depending on thickness)
- That’s literally it. No oil. No butter. Bacon brings its own fat.
Pro shopping tip: Quality matters more than you think. Look for bacon with clear, distinct lines of pink meat and white fat, no gray patches, and ideally a thick-cut applewood or hickory smoked variety if you want maximum flavor. The better the bacon, the better the result — there’s no technique on earth that rescues sad, watery, low-grade bacon.
How to Cook Bacon in the Oven — Step by Step
This is the method I come back to every time. It works with any standard oven and any brand of bacon.
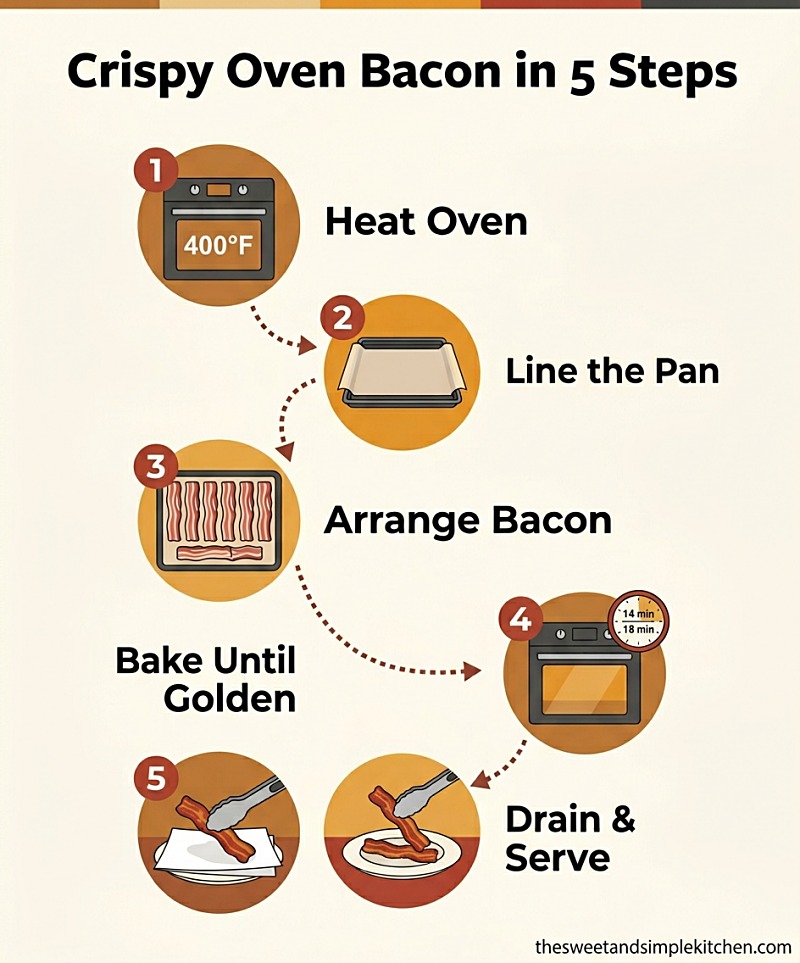
Step 1: Heat the Oven to 400°F (204°C)
Place a rack in the center position of the oven. If you’re cooking two pans at once, use the upper-third and lower-third positions and rotate the pans halfway through.
Why 400°F? It’s the Goldilocks temperature. Hot enough to render fat efficiently and trigger that beautiful Maillard browning, but not so hot that the bacon scorches before the inside cooks through. You can go as low as 375°F (gentler, slower) or as high as 425°F (faster, watch closer) — I’ll cover those variations below.
Step 2: Line the Baking Sheet
Tear off a sheet of parchment paper or heavy-duty aluminum foil and lay it across your rimmed baking sheet, letting the corners overhang on all four sides. The overhang catches every drop of bacon grease and makes cleanup a five-second job — just lift, fold, and toss (or pour off the grease into a jar first, see below).
Parchment vs. foil: Both work equally well. Foil is sturdier and better for saving grease (it doesn’t soak through). Parchment is non-stick and slightly more eco-friendly. I use whichever I grab first.
Critical: Use a rimmed sheet pan. A flat cookie sheet will let bacon grease spill onto the bottom of your oven, which is — speaking from experience — a smoke alarm situation you don’t want.
Step 3: Arrange the Bacon
Lay the strips out in a single layer. They can be close together or even just barely touching, but don’t overlap them — bacon shrinks as the fat renders, so what looks crowded going in will look perfectly spaced coming out. Overlapping strips will fuse together and cook unevenly.
Step 4: Bake
Slide the pan onto the center rack and bake:
- Regular-cut: 14–16 minutes
- Thick-cut: 18–20 minutes
- Thin-cut: 12–14 minutes
Start checking around the 12-minute mark. You’re looking for deep golden-brown strips with the fat turning translucent and bubbly. The bacon will continue crisping for a minute or two after you pull it out, so it’s better to err on the slightly-under side than to let it go too far.
Step 5: Drain and Serve
Use tongs to transfer the bacon to a paper-towel-lined plate. Let it sit for 1–2 minutes — this is when it does its final crisp. Serve immediately, or store as described below.
Should You Use a Wire Rack?
Honest answer: it depends on how crispy you like your bacon.
Use a rack if:
- You want bacon that’s crisp end-to-end with zero chewy spots (think restaurant BLT bacon)
- You’re cooking thick-cut and want full fat rendering
- You don’t mind washing the rack afterward
Skip the rack if:
- You like bacon with a tender, slightly chewy center
- You hate scrubbing rack tines (fair)
- You want maximum convenience
Cooking on a rack lets hot air circulate underneath the bacon, so it crisps from both sides and the rendered fat drips down into the pan. The trade-off is cleanup — bacon grease + tiny grid = elbow grease. If you go this route, give the rack a quick spritz of nonstick spray first, and soak it in hot soapy water the moment you take the bacon off.
The Cold-Oven Method (Worth Trying)
Here’s a technique that’s gained a cult following, and the science backs it up: start your bacon in a cold oven.
Slide the lined sheet pan with raw bacon into a cold oven, then turn the oven on to 400°F (or 425°F for crisper results). The bacon cooks gradually as the oven heats up, which means the fat renders slowly and evenly — less curling, less splatter, more uniform crispness.
Chefs and food writers swear by this method because the gentle ramp-up gives the lean meat and the fat time to cook in sync. A hot oven shocks the lean meat into tightening before the fat has a chance to render, which is why you sometimes get those weirdly contracted, curled-up strips.
Cold-oven timing: Set to 425°F and check at 20 minutes for regular-cut, 25 minutes for thick-cut. Total cook time runs about 5 minutes longer than the preheated method, but you save the preheating wait, so it’s basically a wash on time. The texture is excellent.
I’ll be honest — for everyday bacon, the preheated 400°F method is what I default to. But if I’m cooking thick-cut for a special breakfast, the cold-oven method delivers the most evenly crisp, flat strips I’ve ever managed at home.
Cooking Times Decoded: A Deeper Look
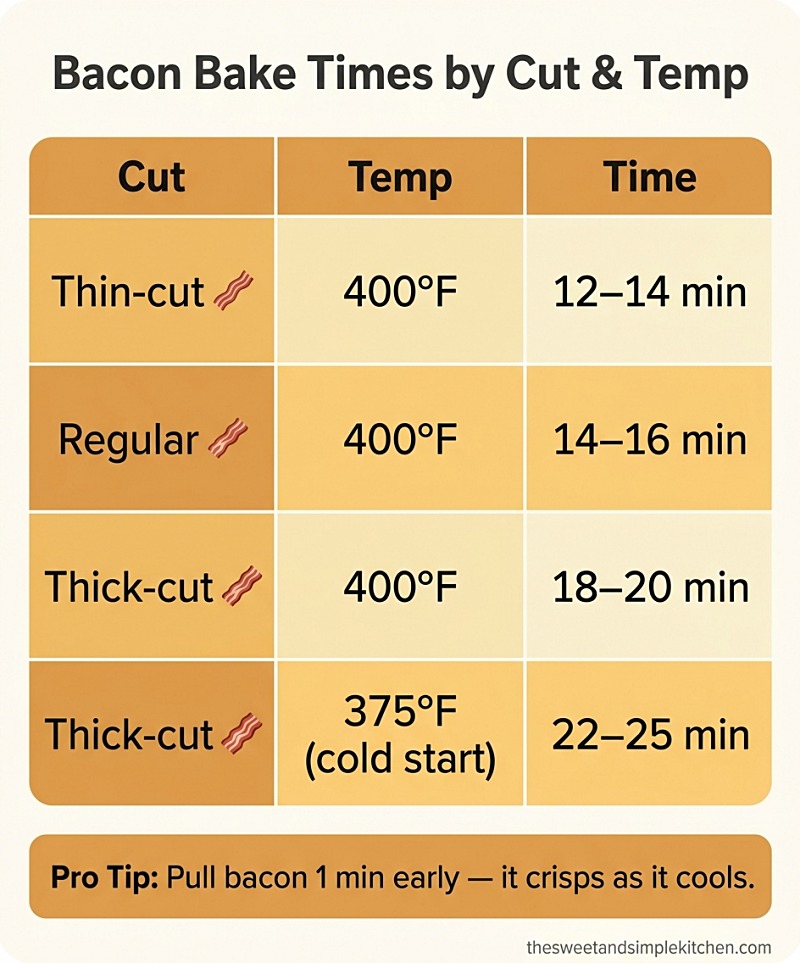
Bake times vary based on three things: bacon thickness, your oven’s actual temperature (most home ovens are off by 10–25°F), and how crisp you want it. Use the chart above as a starting point, then dial in your own perfect time after one or two tries.
A good habit: write the time and temp that worked best on a sticky note inside a kitchen cupboard. Your oven, your bacon, your perfect timing.
Crispy vs. Chewy: How to Get Either
This is one of the underrated perks of oven bacon — you control the texture with absolute precision.
- Chewy: Pull the bacon when the strips are just turning golden but the fat is still slightly translucent. About 1–2 minutes earlier than your usual.
- Standard crisp: Deep golden-brown, fat mostly rendered, edges starting to ripple.
- Shatteringly crispy: Dark amber, fat fully rendered (almost no white left), the strips stiff. Watch closely in the last 2 minutes — bacon can go from perfect to burnt fast.
If you’ve got mixed-preference eaters at the table, pull a few strips early for the chewy crowd and leave the rest in to crisp up. One pan, two textures, everyone happy.
Is My Bacon Cooked Through? (Food Safety, Briefly)
According to the USDA’s bacon and food safety guidance, bacon should be cooked completely before eating — never partially cooked and then refrigerated to finish later. It’s hard to take an internal temperature reading on something as thin as bacon, but the agency notes that bacon cooked to a crisp, deep-brown finish has reached a safe temperature.
The visual cues are reliable: pink raw meat turns rich brown, white fat turns translucent gold, and the strips firm up and curl at the edges. If your bacon still looks limp and pink-streaked, it’s not done.
Note that cured bacon can stay slightly pink even when fully cooked — that’s the curing salts at work, not undercooking. Trust the texture, not just the color.
7 Common Mistakes That Wreck Oven Bacon
- Overlapping the strips. They fuse together. Single layer always.
- Using a flat baking sheet without rims. Bacon grease in your oven = smoke alarm.
- Skipping the liner. Sure, you can bake directly on the pan, but you’ll be scrubbing for 10 minutes afterward.
- Walking away for too long. Set a timer and check at 12 minutes. The last 3 minutes are where everything happens.
- Pouring hot grease down the drain. It hardens and clogs pipes. Let it cool, then pour into a jar or wrap it in the foil and toss.
- Cooking from frozen. Thaw bacon in the fridge first — frozen bacon cooks unevenly and splatters more.
- Not letting it rest. Bacon crisps as it cools. Pull it 60 seconds early and let those paper towels do their job.
Pro Tips From My Kitchen
- For perfectly flat strips: Press the bacon down gently with a fork during the first 2 minutes, or use the cold-oven method. Both prevent curling.
- For more flavor: Sprinkle with cracked black pepper before baking. For candied bacon, dust the strips with a little brown sugar (about 1 teaspoon per 4 strips) — magic happens in the oven.
- For maple-glazed bacon: Brush each strip with pure maple syrup at the 10-minute mark, then bake for the remaining time. Don’t add syrup at the start — it’ll burn.
- For meal prep: Bake the whole pound on Sunday. Crumble half for salads, soups, and pasta during the week. Save the rest as whole strips for sandwiches and breakfast.
- For grease as gold: Pour the warm rendered fat through a fine-mesh strainer into a glass jar, refrigerate, and use it for roasting Brussels sprouts, cooking eggs, or starting a soup. It’s one of the most underrated kitchen ingredients.
How to Store, Freeze, and Reheat Cooked Bacon
Bacon keeps surprisingly well, which is why batch-baking is such a strong move.
Refrigerator: Cool completely, then store in an airtight container or zip-top bag. Lasts 4–5 days. Press out as much air as possible — oxygen is what makes cooked bacon go off.
Freezer: Lay cooled strips on a parchment-lined sheet pan and freeze flat for 1–2 hours, then transfer to a freezer bag. This way the strips don’t stick together and you can grab one at a time. Lasts about 1 month for best quality.
Reheating options:
- Oven (best): 350°F for 3–5 minutes on a foil-lined sheet — restores the crisp.
- Air fryer: 350°F for 2–3 minutes.
- Microwave (fastest): 10–15 seconds per strip on a paper-towel-lined plate. Great for one or two slices, less great for crispness.
- Skillet: Cold pan, medium-low heat, 1–2 minutes per side.
Variations Worth Trying
- Peppered bacon: Coarse cracked pepper before baking. Classic.
- Brown sugar bacon: Sprinkle ½ teaspoon brown sugar per strip after 8 minutes.
- Spicy candied bacon: Brown sugar + cayenne + black pepper. Sweet, hot, savory all at once.
- Maple-bourbon glaze: Brush with a mix of maple syrup and a splash of bourbon at the 10-minute mark.
- Bacon-wrapped anything: Use the oven method to par-cook strips for 6–8 minutes before wrapping them around dates, asparagus, or chicken. Pre-cooking renders the fat so the bacon crisps fully when finished.
Frequently Asked Questions
Do I need to flip bacon in the oven?
No. The hot air circulates around the strips, so flipping is unnecessary. Some people rotate the pan halfway through for evenness, especially in older ovens with hot spots, but flipping the strips themselves doesn’t help.
What temperature should I use to cook bacon in the oven?
400°F (204°C) is the universal sweet spot for crispy oven bacon. Anywhere from 375°F to 425°F works depending on your preference — lower temps render fat more slowly for chewier results, higher temps brown faster but need closer watching at the end.
How long does bacon take to cook at 400°F?
Regular-cut bacon takes 14–16 minutes at 400°F. Thick-cut needs 18–20 minutes. Thin-cut may be done in as little as 12 minutes. Always start checking at the 12-minute mark.
Can I cook bacon in a cold oven?
Yes — and many cooks prefer it. Place the lined pan with bacon in a cold oven, then set the temperature to 400–425°F. The fat renders gradually as the oven heats up, producing more even crispness with less curling. Total cook time is about 5 minutes longer than the preheated method.
Should I use parchment paper or foil?
Both work equally well. Foil is sturdier and easier for catching grease to save later. Parchment is non-stick and a little more eco-conscious. Heavy-duty foil with the corners folded up is my personal default.
Why is my oven bacon not crispy?
Three usual suspects: the strips are overlapping (steam, not crisp), the oven is running cool (an oven thermometer will tell you), or you’re pulling it too early. Bacon also keeps crisping for a minute or two after it leaves the oven, so don’t judge the texture while it’s still hot from the pan.
Can I cook frozen bacon in the oven?
It’s safe but not ideal — frozen bacon cooks unevenly and produces more splatter. Thaw it overnight in the fridge for best results. The USDA recommends refrigerator thawing as the safest method, and bacon thawed this way stays good for 7 days before cooking.
How do I keep bacon from curling in the oven?
Two tricks work. First, baking on a wire rack keeps the strips supported on both sides, which prevents shrinkage curl. Second, the cold-oven start renders fat slowly enough that the lean meat doesn’t tighten and contract.
Is it OK to save the bacon grease?
Yes — strain it through a fine-mesh sieve into a heatproof jar while it’s still warm-liquid, let it cool, and refrigerate. Use it for roasting vegetables, cooking eggs, or as a base for soups. Refrigerated bacon grease keeps for up to 6 months.
How long does cooked bacon last in the fridge?
Cooked bacon stays good in the refrigerator for 4–5 days in an airtight container, per USDA storage guidelines. For longer storage, freeze it — cooked bacon keeps about a month in the freezer with good quality.
Can you cook bacon in a convection oven?
Absolutely. Convection cooks bacon faster and crispier because the air circulates more aggressively. Drop the temperature by 25°F (so 375°F instead of 400°F) and start checking 2–3 minutes earlier than the standard times.
What’s the safe internal temperature for cooked bacon?
The USDA’s safe minimum internal temperature chart recommends cooking pork (including bacon) to at least 145°F (63°C). In practice, crispy bacon will sail well past that temperature — properly crisped strips are always safe.
A Few Recipes That Use Oven-Baked Bacon Beautifully
Once you’ve got a pound of perfectly baked bacon ready, the possibilities are endless. Crumble it onto a baked potato. Layer it onto a BLT with thick-sliced summer tomatoes. Stir bits into pasta with a parmesan-cream sauce. Top a wedge salad with chunks. Wrap par-cooked strips around dates stuffed with goat cheese for an instant party appetizer.
Bake one batch on a Sunday and you’ve got the building block of about a dozen midweek meals.
Final Thoughts: Why You’ll Never Go Back
Once you’ve baked bacon a few times, the stovetop will start to feel like the long way around. No splatter, no flipping, no babysitting — just a sheet pan, a 14-minute timer, and breakfast that tastes like it came out of a diner.
The next time someone in your house asks how to cook bacon and doesn’t end up with a greasy stovetop and half-burnt strips? That’ll be the moment you realize you’ve quietly become the bacon expert of the family. Welcome to the club.
Save this guide — it’s the only bacon method you’ll ever need. Pin it for the next big-batch breakfast or holiday brunch.