
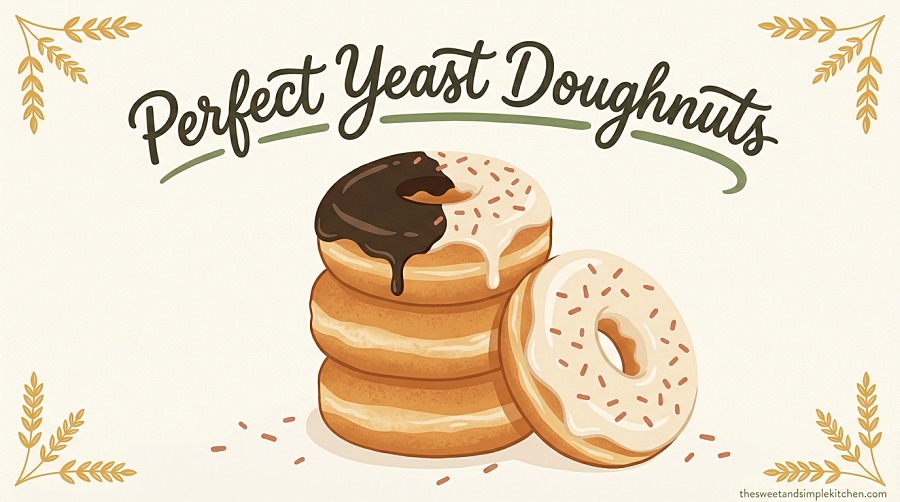
I went on a doughnut quest a while back. Two weeks, six failed batches, an alarming amount of canola oil, and one very patient husband later, I finally cracked it. This perfect yeast doughnuts recipe is the result of every test batch I lived through, and I genuinely think it makes the softest, fluffiest homemade donut you can pull off in a regular kitchen. They are huge by design (I measured one — 4 inches across) and double-glazed, because if you are going to fry a doughnut you might as well commit.
Perfect yeast doughnuts are made from an enriched, lightly sweetened bread dough that rises twice — once cold, once warm — before being deep-fried at 350°F for about 1 minute per side. The cold rest builds flavor and structure; the warm proof gives them their signature pillowy lift. Glaze while still slightly warm so the icing sets glossy.
Table of Contents
Perfect Yeast Doughnuts Recipe At a Glance
| Detail | Info |
|---|---|
| Prep Time | 30 minutes |
| Rising Time | 1 hr 30 min (or overnight) |
| Cook Time | 15 minutes |
| Total Time | About 2 hr 15 min (active) |
| Servings | 10–12 large doughnuts + holes |
| Difficulty | Intermediate |
| Calories (approx) | 380 per glazed doughnut |
| Cuisine | American |
Why This Recipe Works
Most homemade doughnut recipes give you a respectable donut. Fine. Edible. Tasted-better-at-the-shop, kind of donut. This one is different for three reasons I figured out the hard way:
- A pre-ferment (sponge) instead of just adding all the yeast at once. You let two of the three yeast packets bloom in warm milk and a bit of flour for 30 minutes before mixing the rest of the dough. That sponge is alive, foamy, and full of flavor by the time you build the dough around it. According to King Arthur Baking, pre-fermenting is what gives bakery-style donuts their depth and that signature yeasty aroma.
- Cold rest in the fridge for at least 1 hour (up to 12). Cold fermentation slows the yeast just enough to develop complex flavor while the gluten relaxes. Easier to roll. Better tasting. Same trick the pros at America’s Test Kitchenuse to time doughnuts for breakfast.
- Bread flour, not all-purpose. Higher protein = more structure = the puffy, tall, hold-their-shape donut you actually want.
The double glaze is just a bonus. I dunked the originals once and thought, “what if I did it twice.” Best decision in my baking career.
Ingredients (with my honest notes)
For the Doughnut Dough
- 3 packets (¼ oz each) active dry yeast — not quick-rise, not instant. Active dry. We’re using a sponge method that needs the slower bloom. Three packets sounds like a lot, but it’s what makes these rise tall and fast in the second proof.
- 2 tbsp honey — feeds the yeast and adds a tiny floral note you cannot quite identify but absolutely miss when it’s gone.
- 1 tbsp granulated sugar — for the sponge starter (yeast loves simple sugars to get going).
- 1 cup whole milk, warmed to 110°F — whole milk only. Skim makes a sad, flat doughnut.
- 1 large egg, room temperature — cold egg shocks the dough and slows rise.
- ¼ cup unsalted butter, melted and cooled slightly — richness without weighing the dough down.
- 1 tsp pure vanilla extract — splurge on the real stuff for once.
- ⅛ tsp ground cinnamon — you won’t taste cinnamon, but the dough tastes warmer.
- ⅛ tsp freshly grated nutmeg — non-negotiable. This is the secret to that “old-fashioned bakery” flavor.
- ½ tsp fine salt — balances the sweet glaze.
- 2 ¼ – 2 ½ cups bread flour — start with 2 ¼ and add more only if your dough is climbing the hook.
- Canola or vegetable oil, for frying — about 6 cups, enough for 2 inches in your pot.
For the Vanilla Glaze
- 1 ½ cups icing sugar (powdered sugar)
- 2–3 tbsp warm water
- 1 tsp vanilla extract
For the Chocolate Glaze
- 1 ½ cups icing sugar
- 4 tbsp unsweetened cocoa powder (Dutch-process if you have it)
- 3–4 tbsp warm water
- 1 tsp vanilla extract
Equipment You’ll Need
A stand mixer with paddle and dough hook attachments will make your life dramatically easier — you can do it by hand but plan on a 12-minute arm workout. You’ll also want:
- A heavy-bottomed pot or Dutch oven (4 qt minimum)
- A clip-on candy/oil thermometer (this is the single most important piece of gear — guessing oil temp is how you end up with greasy donuts)
- A 3-inch round cutter and a 1-inch round cutter for the holes (or use the wide end of a piping tip for the centers)
- A slotted spoon or spider strainer
- Two parchment-lined baking sheets
- A wire cooling rack set over a sheet pan
Step-by-Step Instructions
Step 1 — Build the Sponge
In the bowl of a stand mixer, whisk together 2 of the 3 packets of yeast, the 1 tbsp granulated sugar, ¾ cup of the warm milk (110°F), and ¾ cup of the bread flour. You’re making a thick, pancake-batter-like paste. Cover the bowl with plastic wrap and set it in a warm spot for 30 minutes, until it looks foamy and alive on top.
Pro tip: No warm spot? Heat your oven to 200°F, turn it off, crack the door, then put the bowl in. Perfect proofing chamber.
Step 2 — Build the Dough
After 30 minutes, attach the paddle to your mixer. Add the remaining yeast packet, the rest of the milk, the honey, the egg, melted butter, vanilla, cinnamon, nutmeg, and salt. Beat on medium until smooth — about 1 minute.
Switch to the dough hook. Add the bread flour ¼ cup at a time until the dough pulls away from the sides of the bowl. Crank the mixer to medium-high and let it knead for 5 minutes until the dough is smooth, elastic, and slaps against the side of the bowl.
If it’s sticking to the bottom of the bowl after 3 minutes, add another tablespoon of flour. If it’s tearing instead of stretching, add a teaspoon of milk. You want a soft, slightly tacky dough — not dry, not gluey.
Step 3 — First Rise (Cold)
Turn the dough out, shape it into a ball, and drop it into a lightly greased bowl. Cover with plastic wrap and refrigerate for at least 1 hour, up to 12 hours. Overnight is genuinely better — the flavor deepens and the dough handles like a dream.
Step 4 — Roll, Cut, and Second Rise
Heat 2 inches of canola oil in your pot to 350°F while you prep the doughnuts. Punch down the dough, turn it onto a lightly floured surface, and roll to ¾-inch thickness (this is critical — too thin and they won’t puff, too thick and they won’t cook through).
Cut with a 3-inch round cutter and use a 1-inch cutter for the centers. Re-roll scraps and cut more. Drop the holes onto a parchment sheet too — they fry up faster and you’ll want them.
Transfer the cut doughnuts to two parchment-lined sheets, leaving 1 inch around each. Cover loosely with plastic wrap and let rise in a warm spot for 20–25 minutes, until they look puffy and almost doubled. Press the side gently — if the dough springs back slowly leaving a faint dent, they’re ready.
Step 5 — Fry
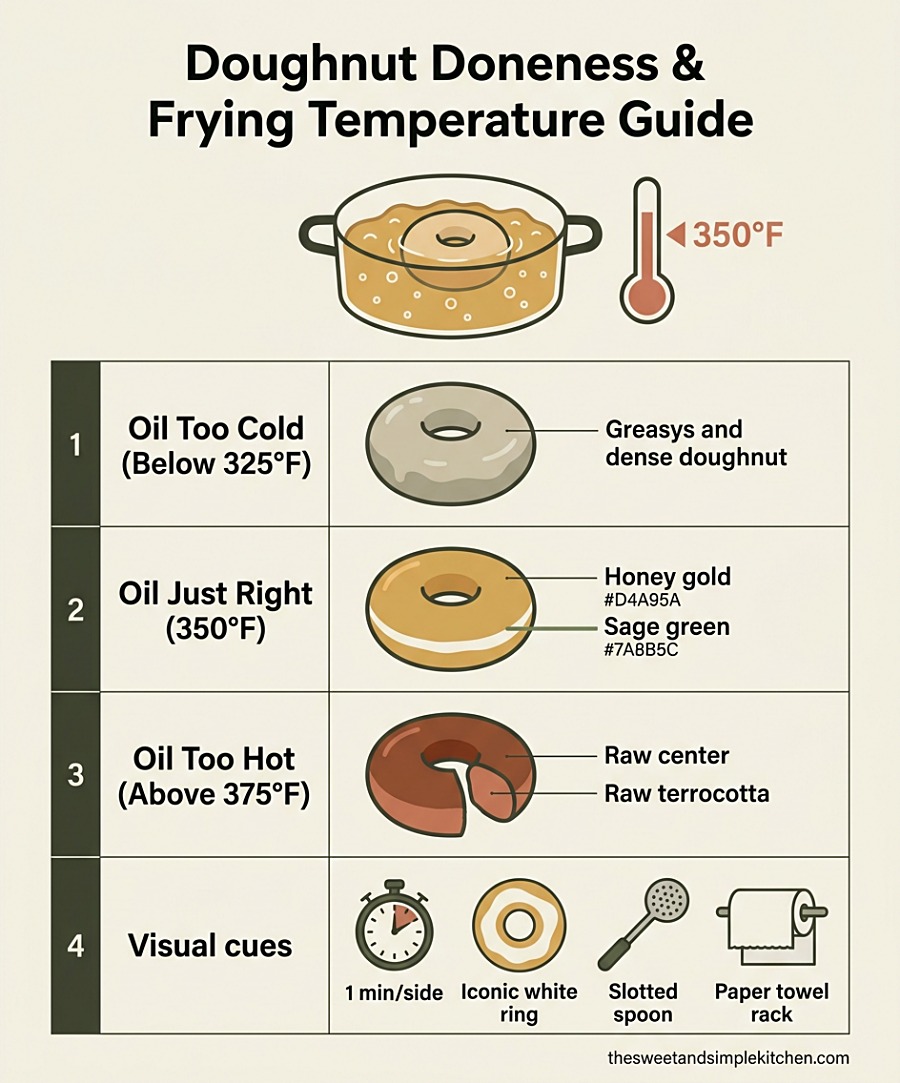
Drop 2–3 doughnuts into the hot oil (don’t crowd — the oil temp will crash). Fry about 1 minute per side until deep golden brown. The pale “white ring” you see around the middle of bakery donuts? That’s the dough that didn’t touch oil — and it means you got the proof and the temp right.
Lift out with a slotted spoon, drain on a wire rack (not paper towels — they steam and turn soggy on paper), and let cool 10 minutes before glazing. Doughnut holes need 30–45 seconds total.
Step 6 — Double Glaze
Vanilla glaze: Whisk icing sugar, vanilla, and 2 tbsp water until smooth. Add the third tablespoon if needed — you want it pourable but not transparent.
Dip the top and bottom of each doughnut in the vanilla glaze. Wipe excess with your finger. Set on the rack to set for 10 minutes.
Chocolate glaze: Whisk icing sugar, cocoa, vanilla, and 3 tbsp water. Add the fourth tablespoon only if needed. You want it glossy and just barely pourable — a thick coat is the whole point.
Once the vanilla layer is set, dip just the top half of each doughnut in the chocolate. Set back on the rack for another 10 minutes. The two glazes set into a glossy, two-tone finish that looks like you bought them.
My 5 Pro Tips After 6 Test Batches
- Weigh your flour if you can. A cup of flour can vary by 30 grams depending on how you scoop. For this recipe: 2 ¼ cups bread flour = roughly 280g. Reduce flour by weight in humid weather.
- The thermometer is non-negotiable. Oil at 325°F = greasy donuts. Oil at 375°F = burnt outside, raw center. 350°F is the sweet spot, and it will drift every time you add doughnuts. Adjust your burner constantly.
- Don’t skip the cold rest. I tested back-to-back: same dough, one rested 1 hour cold, one rested 8 hours cold. The 8-hour version had visibly better structure and tasted noticeably more complex.
- Glaze warm, not hot. Glaze too soon and it melts off. Glaze too late and it sits in droplets. About 10 minutes after frying is the magic window.
- Fry the doughnut holes first. They’re forgiving, smaller, and they let you dial in your oil temp before you commit to a full doughnut.
Variations
This dough is the workhorse — once you’ve nailed it, you can take it in a dozen directions. Some of my favorites:
- Cinnamon sugar: Skip the glazes. Toss warm doughnuts in 1 cup granulated sugar mixed with 2 tbsp cinnamon. The sugar sticks because the doughnut is still slightly oily — magic.
- Filled (Boston Cream / Jelly): Cut as solid rounds (no center hole). After frying, use a chopstick or skewer to make a hole in the side and pipe in pastry cream, lemon curd, or raspberry jam. Glaze the top.
- Maple bacon: Swap the chocolate glaze for one made with 1 ½ cups icing sugar + 3 tbsp pure maple syrup + 1 tbsp water. Top with crumbled cooked bacon.
- Cardamom-orange: Add ½ tsp ground cardamom and 1 tbsp orange zest to the dough. Glaze in a single thin vanilla layer with orange zest sprinkled on top. (If you love this combo, my blood orange cardamom cake uses the same flavor pairing.)
- Apple cider: Swap ½ the milk for boiled-down apple cider for a fall version that tastes like a farm stand. My apple cinnamon pop tarts use a similar reduction trick.
Make-Ahead, Storage & Freezer Notes
Make-ahead: Make the dough the night before, give it the cold rise overnight, then roll, cut, proof, and fry in the morning. This is the move. Doughnuts always taste best fresh-fried.
Storage: Glazed doughnuts are best the day they’re made. Hands down. After about 6 hours they soften and the glaze starts to weep. If you must store leftovers, keep them in a single layer in an airtight container at room temperature for up to 24 hours. Do not refrigerate — the cold dries them out.
Freezing: Freeze unglazed doughnuts only. Cool completely, freeze in a single layer on a sheet, then transfer to a zip-top bag for up to 1 month. Thaw at room temp for 30 minutes, then warm in a 300°F oven for 4–5 minutes before glazing fresh.
Reheating: A 6–8 second microwave zap brings a day-old doughnut about 80% of the way back. The butter in the dough re-softens and they taste bakery-fresh again.
Serving Suggestions
These don’t really need an accompaniment — they are the event. But if I’m making a brunch spread, I serve them alongside:
- A pot of strong coffee (the chocolate glaze + dark roast is unbeatable)
- Cold whole milk (the only acceptable doughnut beverage according to my dad)
- Fresh berries to cut the sweetness
- A few of my peanut butter chunker cookies for the dessert table at parties — sweet, salty, loaded
- A round of easy chocolate chip cookies on the platter for the kid contingent
For full breakfast energy, I pair these with easy banana bread and fresh fruit — a little balance never hurt anyone.
Common Mistakes & How to Fix Them
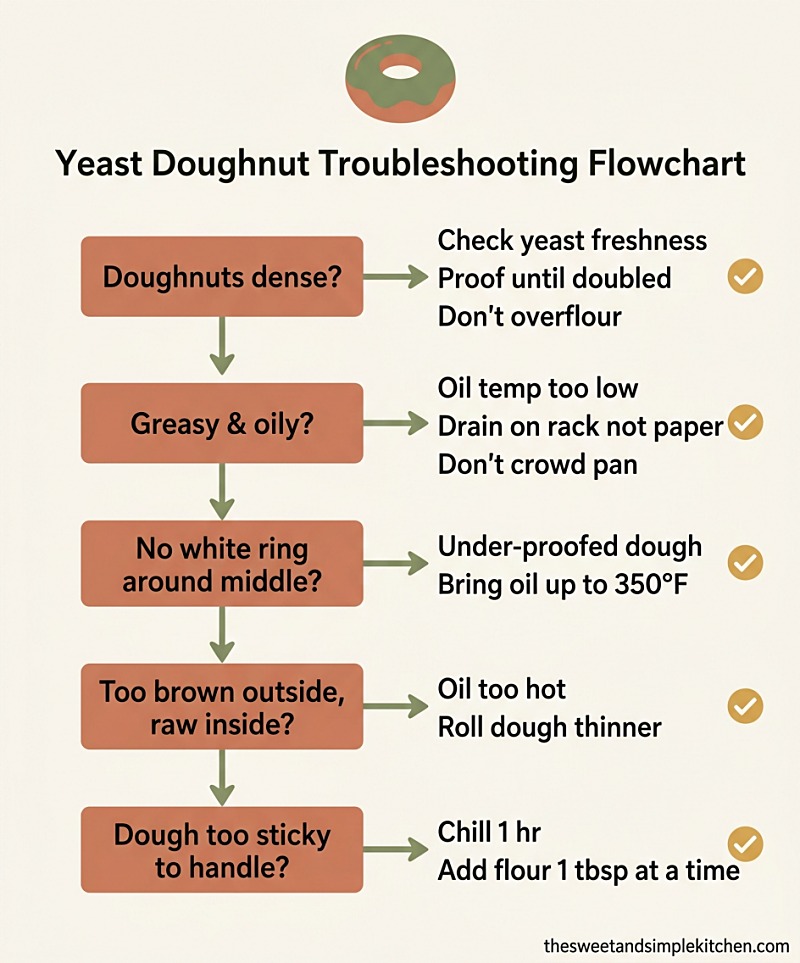
- Doughnuts came out dense and bready. Either your yeast was old (test it: bloom a packet in warm sugar water; if it doesn’t foam in 10 minutes, toss it), you over-floured the dough, or you skipped the second rise. The doughnuts must look puffy and almost doubled before they hit oil.
- Doughnuts soaked up oil and tasted greasy. Oil temp was too low. Recover with the thermometer between batches and let the oil reheat to 350°F before adding the next round. Frying on a reliable oil temperature is the difference between fluffy and fried sponge.
- No white ring around the middle. This is the bakery hallmark — it forms when a properly proofed doughnut hits properly heated oil and floats high. Missing ring = under-proofed, oil too cold, or both.
- Doughnuts puffed up and then collapsed. Over-proofed. The yeast made too many gas bubbles for the gluten to support, and they deflated when they hit oil. Next time, watch the second rise like a hawk and pull them at 20 minutes.
- Glaze ran off in droplets and looked weepy. The doughnuts were too hot. Wait the full 10 minutes. The sugar glaze needs slightly cooler dough to grip.
- Doughnuts were tough or chewy. Over-kneaded. Five minutes on medium-high in the stand mixer is plenty. If you’re hand-kneading, stop the moment the dough feels smooth and slightly springy.
FAQ
Can I make these doughnuts without a stand mixer?
Yes — but plan on real arm work. Mix everything in a large bowl with a wooden spoon until shaggy, then turn out and knead by hand for 10–12 minutes until smooth and elastic. The pre-ferment sponge step works exactly the same in a regular bowl.
Can I bake these instead of frying?
You can, but they won’t be the same doughnut. Fried gives you the crisp shell and tender pull-apart interior. Baked yields more of a roll texture. If you want to try: 375°F for 8–10 minutes on a parchment sheet, brush with melted butter immediately after baking, then dip in glaze.
Can I use instant yeast instead of active dry?
Yes — use the same amount but skip the 30-minute sponge step. Mix everything together and proceed straight to kneading. You’ll lose a little flavor depth, but the texture stays the same.
How long do homemade yeast doughnuts last?
Best within 6 hours of frying. They stay acceptable for 24 hours at room temperature in an airtight container. After day 2, they’re firmly in the “throw in the toaster oven and pretend” category.
Why did my doughnuts come out dense and not fluffy?
Three usual suspects: dead yeast, too much flour, or under-proofing. Test your yeast before you start, weigh your flour if possible, and let the second rise go until the doughnuts look visibly puffy — never hit oil with tight, firm dough.
Can I freeze the dough instead of finished doughnuts?
You can. After the cold rise, punch down, wrap tightly in plastic, and freeze up to 1 month. Thaw overnight in the fridge, bring to room temp for 30 minutes, then proceed with rolling and frying.
What’s the ideal oil temperature for frying doughnuts?
350°F. Below that, you get oily donuts. Above 365°F, the outsides cook before the insides do. A clip-on thermometer is the only way to actually hold this temp while frying — the oil cools every time you add a doughnut.
Can I use all-purpose flour instead of bread flour?
Yes, but the doughnuts will be slightly more tender and slightly less tall. America’s Test Kitchen actually prefers all-purpose for that exact reason. I prefer bread flour for a chewier bakery-style bite. Try both and decide for yourself.
The Bottom Line
If you’ve been chasing the perfect yeast doughnuts recipe for years like I was, this is the one I’d hand you. It’s been tested into the ground, the double glaze is genuinely worth the extra 10 minutes, and the cold-rest method makes the dough behave even for first-timers. Make the dough tonight, fry them tomorrow morning, and you’ll have a kitchen full of people who suddenly love you a little more.
If you tried this perfect yeast doughnuts recipe, leave a comment and tell me which glaze you went with — chocolate, vanilla, or both like I always do. Pin it, save it, send it to the friend who’s been promising to bake more this year.
Happy frying.
KP xoxo