
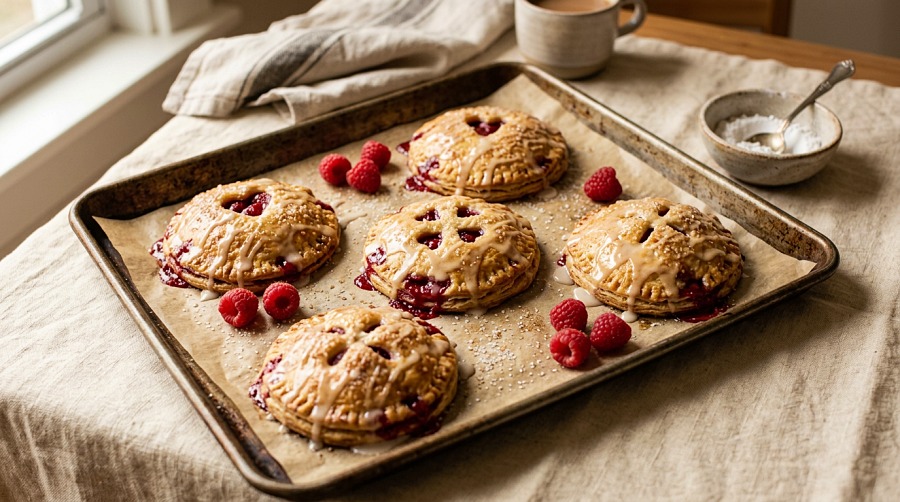
The first time I made berry hand pies on a whim, it was a sticky July afternoon and I had a half-thawed sheet of puff pastry and a clamshell of raspberries threatening to go soft on the counter. Forty minutes later I was eating one straight off the cooling rack, glaze still warm, juice running down my wrist. These homemade berry hand pies have been my go-to easy summer dessert ever since, and after testing this recipe across seasons and swapping in just about every fruit you can think of, I have it dialed in.
Berry hand pies are individual fruit pies made by folding a square or circle of pastry over a sweetened berry filling, sealing the edges, and baking until the pastry is golden and flaky. Using frozen store-bought puff pastry, you can have a batch from freezer to oven to plate in under an hour. They hold their shape, they freeze beautifully unbaked, and they look like you fussed when you absolutely did not.
| Recipe Detail | Info |
|---|---|
| Prep time | 20 minutes |
| Chill time | 15 minutes |
| Bake time | 25 to 30 minutes |
| Total time | 1 hour |
| Servings | 8 hand pies |
| Difficulty | Easy |
| Approx. calories | 280 per pie |
| Cuisine | American |
Below you will get the exact filling ratio I use, the sealing method that stops them from leaking in the oven, freezer-to-oven instructions, and seven flavor variations including the tart-sweet fruit pairing trick I always reach for.
Table of Contents
Why This Berry Hand Pies Recipe Works
Frozen puff pastry is the unsung hero of weeknight baking. It is laminated dough — hundreds of paper-thin layers of butter and flour — and when it hits a hot oven, the water in the butter flashes to steam and pushes those layers apart. That is what gives you the dramatic puff and shattering crispness you get from a bakery pastry. The good brands, like Pepperidge Farm and Dufour, use real butter and behave almost identically to homemade.
The second thing this recipe gets right is the cornstarch-to-fruit ratio. Berries release a shocking amount of liquid as they bake, and without enough thickener you end up with soggy bottoms and filling weeping out the seams. One tablespoon of cornstarch per heaping cup of fruit is the sweet spot for puff pastry hand pies — enough to thicken the juices without turning the filling gluey. King Arthur Baking’s fruit pie thickener guide is the resource I keep coming back to whenever I am tweaking ratios for a new fruit.
The third trick is chilling the assembled pies before baking. Fifteen minutes in the freezer firms up the butter in the dough, which means the layers separate cleanly in the oven instead of slumping and melting before they have a chance to puff. Skip this step and you will still get tasty pies. Take the fifteen minutes and you will get bakery pies.
Ingredients
This recipe makes 8 hand pies using a 1-pound box of frozen puff pastry (2 sheets). I am giving you my favorite raspberry-apple filling here, but I have notes on every other fruit combo I have tested further down.
For the pastry
- 1 box (2 sheets) pre-rolled puff pastry, thawed in the fridge overnight or on the counter for 40 minutes. Pepperidge Farm is widely available and dairy-free if that matters to you. Dufour is the splurge and tastes noticeably more buttery.
For the raspberry-apple filling
- 1 heaping cup fresh raspberries (about 150 g)
- 2 medium apples, peeled and thinly sliced (Honeycrisp, Granny Smith, or Pink Lady all work — see notes)
- 1/4 cup brown sugar, packed (adjust up to 1/3 cup if your fruit is very tart)
- 1 tbsp cornstarch (do not skip; this is what stops leaking)
- 1 tsp fresh lemon zest (orange zest works too)
- Pinch of salt
- Pinch of cinnamon (optional but recommended)
For the egg wash
- 1 egg, beaten
- 1 tsp heavy cream or milk
- Pinch of sugar
- 1 tbsp coarse sugar (turbinado or demerara) for sprinkling
For the simple vanilla glaze
- 3/4 cup icing sugar (powdered sugar), sifted
- 1 to 2 tbsp heavy cream, plus more as needed
- 1/2 tsp vanilla extract or a few drops of vanilla bean paste
Ingredient notes and honest substitutions
Apples: Honeycrisp gives you the best balance of sweet and tart. Granny Smith is more aggressive — pair it with sweeter berries like blueberry or strawberry. Pink Lady holds its shape best if you like a little bite in the filling.
Cornstarch swap: All-purpose flour works in a pinch at 1.5 tbsp instead of 1 tbsp, but the filling will be slightly cloudier. Tapioca starch is a great swap at a 1:1 ratio and actually thickens cleaner than cornstarch — it just costs more. Arrowroot also works 1:1.
Brown sugar swap: Granulated, coconut sugar, maple syrup (reduce to 3 tbsp), or honey (3 tbsp) all work. Brown sugar gives the deepest flavor because of the molasses.
No cream for the glaze?: Whole milk works, oat milk works, water works (the glaze will just be slightly less rich). Start with 1 tbsp and add a few drops at a time until you hit a thick-but-drizzleable consistency.
Equipment
- Baking sheet
- Parchment paper
- Pastry brush
- Fork (for crimping)
- Small bowl for egg wash
- Mixing bowl for filling
- Sharp paring knife
- Whisk for the glaze
How to Make Berry Hand Pies, Step by Step
1. Prep the oven and pastry
Preheat your oven to 375°F (190°C) and line a baking sheet with parchment. Pull the puff pastry out of the fridge — it should be cold but pliable, not stiff. If it cracks when you unfold it, give it 5 more minutes at room temp.
2. Make the egg wash
In a small bowl, whisk together the egg, cream, and pinch of sugar. Set aside.
3. Mix the filling
In a medium bowl, gently stir together the raspberries, sliced apples, brown sugar, lemon zest, cornstarch, salt, and cinnamon. Stir for about 30 seconds, just until the cornstarch is no longer powdery and the fruit is evenly coated. You do not want to crush the raspberries — they will break down enough in the oven.
4. Cut the pastry
Lightly flour a cool surface and unfold the puff pastry sheets. Cut each sheet into 4 equal squares using a sharp paring knife or pizza wheel. Cutting cleanly is important: a dull knife seals the edges shut and stops the pastry from rising. You should have 8 squares total, each roughly 4.5 to 5 inches across.
5. Brush the edges
Use a pastry brush to lightly paint about a half-inch border of egg wash around the edges of each square. This is the glue that binds the top to the bottom and is the single biggest factor in preventing leaks during baking.
6. Fill the pies
Spoon about 3 tablespoons of filling onto one half of each square, leaving that half-inch border bare. If you want triangle pies (my favorite shape), pile the filling into a triangle in one corner. For rectangles, mound it across one half. Do not overfill — squeezing in extra fruit is the second biggest cause of leaks.
7. Fold and seal
Working one at a time, fold the empty half of pastry over the filling so the edges line up. Press the edges firmly with your fingers, then crimp with a fork to lock the seal. Don’t be gentle here — a wimpy seal will split open in the oven.
8. Vent and chill
Cut 2 to 3 small slits in the top of each pie with a paring knife. This is non-negotiable — without vents, steam builds up inside and forces the seams open. Place the assembled pies on your lined baking sheet and freeze for 15 minutes. This is the bakery secret.
9. Wash and sugar
Pull the pies from the freezer and brush the tops with the remaining egg wash. Sprinkle generously with coarse sugar.
10. Bake
Bake on the center rack for 25 to 30 minutes, until the tops are deep golden brown and you can see filling bubbling through the vents. Pale pies are underbaked pies — the bottoms need that full color or they will be doughy.
11. Cool and glaze
Transfer to a wire rack and cool for at least 10 minutes. While they cool, whisk together the icing sugar, cream, and vanilla in a small bowl until smooth. Adjust with a few more drops of cream if too thick, or more icing sugar if too thin. Drizzle over the warm (not hot) pies with a spoon. Eat immediately or let the glaze set for 15 minutes.
My Pro Tips After Making These a Dozen Times
The freezer chill matters more than people think. I have skipped it on lazy nights and the difference is real — the chilled batch puffs about 30% taller and the layers are visibly cleaner.
Tart and sweet is the whole game for fruit pairings. This is the one piece of advice I have been giving since 2026 and it never fails: when you are combining fruits for a hand pie filling, pick something that is naturally tart (raspberry, rhubarb, sour cherry, Granny Smith apple) and pair it with something naturally sweet (peach, blueberry, ripe strawberry, Honeycrisp apple). You get a filling that tastes layered and grown-up instead of cloying. Mixed berry, peach-raspberry, strawberry-rhubarb, peach-blackberry, blueberry-lemon, and cherry-almond are the combos I rotate through.
Cut your fruit small. Big chunks of apple do not soften enough in 28 minutes inside puff pastry. Slice apples thin (1/8 inch) or dice them small (1/4 inch). Berries you leave whole unless they are large strawberries, which should be quartered.
Use a cold work surface. If your kitchen is hot, run a metal pan or a Ziploc of ice over your counter for a minute before rolling out the pastry. Warm pastry leaks butter, sags, and refuses to puff.
Egg wash the tops twice for max shine. Brush once after chilling, let it sit 30 seconds, brush again. The result is glossy enough to use for a magazine photo.
Variations
- Strawberry-rhubarb: 3/4 cup quartered strawberries + 3/4 cup chopped rhubarb + 1/3 cup sugar (rhubarb is aggressively tart, so more sugar). For more rhubarb inspiration, my rhubarb-banana crumble uses the same tart-sweet logic.
- Peach-raspberry: 1 cup diced peaches + 3/4 cup raspberries + 3 tbsp sugar
- Triple berry: 1/2 cup each blueberries, raspberries, blackberries + 1/4 cup brown sugar
- Cherry-almond: 1.5 cups pitted sweet cherries + 1/4 cup sugar + 1/4 tsp almond extract
- Apple-blueberry: 1 cup thinly sliced apple + 1 cup blueberries + 1/4 cup brown sugar + 1/2 tsp cinnamon
- Jam shortcut: Skip the fresh fruit entirely and use 2 tbsp of good-quality jam per pie. Bonne Maman raspberry is my favorite for this — it is thick enough to behave well and tastes much more like real fruit than the cheap stuff.
- Pop-tart style: If you want a flat rectangular pie instead of folded squares, check out my apple cinnamon pop tarts recipe for the technique — it uses the same fundamental approach with a different shape.
Storage, Make-Ahead, and Freezer Notes
Same day: Best eaten the day they are baked, ideally within 4 hours while the pastry is still shatteringly crisp. Leave them uncovered on a wire rack at room temperature.
Day 2 and 3: Store in an airtight container at room temperature for up to 2 days, or in the fridge for up to 4 days. The pastry will soften — this is unavoidable with puff pastry. To restore crispness, reheat in a 350°F oven for 5 to 7 minutes (not the microwave, which kills the texture entirely).
Make-ahead (unbaked): Assemble the pies through Step 8, then freeze them solid on the baking sheet for 2 hours. Transfer to a freezer bag or airtight container and freeze for up to 3 months. Bake directly from frozen — do not thaw — at 375°F for 32 to 38 minutes, adding 5 to 8 minutes to the original bake time.
Make-ahead (baked): Cool completely, freeze unglazed in a single layer until solid, then transfer to a freezer bag for up to 2 months. Reheat from frozen at 350°F for 12 to 15 minutes, then add glaze if desired.
This freezer-friendliness is why I keep a stash of pre-assembled hand pies in my freezer at all times. When a friend stops by or I am suddenly responsible for dessert, I can have warm fresh pies on the table 35 minutes later.
Serving Suggestions
Warm with a scoop of vanilla bean ice cream is the textbook move and never gets old. A small spoonful of no-bake cheesecake filling on the side is the upgrade I make when I want to be a little extra. Whipped cream with a touch of vanilla is the no-fuss option. For breakfast (no judgment), serve with strong coffee and call it a Danish.
If you are building a dessert spread, these go well with anything in my 3-ingredient desserts collection — the contrast between something fussy-looking like hand pies and something effortless is a great party move.
Frequently Asked Questions
Can I make berry hand pies with frozen berries?
Yes, with one adjustment: do not thaw them first. Toss frozen berries directly with the cornstarch, sugar, and zest, then assemble and bake immediately. Thawed frozen berries release too much water and you will end up with soggy pies. You may need an extra 2 to 3 minutes of bake time.
Why are my hand pies leaking filling?
Three usual suspects, in order of likelihood: weak seal (didn’t brush enough egg wash or didn’t crimp firmly), overfilled (too much fruit means the pastry can’t hold it), or no steam vents (pressure forces the seam open). Cut at least 2 slits in the top before baking, every time.
Can I use pie crust instead of puff pastry?
Absolutely. A homemade or store-bought pie crust works at a 1:1 swap. The texture will be more tender and less flaky, more like a traditional fried hand pie. Bake at the same temperature and time.
How do I keep the bottoms from getting soggy?
Bake on a preheated baking sheet (put your lined sheet in the oven as it preheats, then transfer the chilled pies onto it). The direct heat sets the bottom layer immediately. Also make sure your filling has cooled if you pre-cook it — hot filling steams the pastry from the inside out.
Can I make these without an egg wash?
Yes. Use melted butter or heavy cream brushed on top instead. You will not get quite the same deep golden shine, but the pies will still bake through and brown nicely.
Do I need to peel the apples?
For raspberry-apple, I peel because the texture is smoother and more uniform. For an apple-only filling, you can leave the skin on for more fiber and color — just slice thinly so the skin softens fully in the oven.
How far in advance can I make berry hand pies for a party?
Assemble and freeze unbaked up to 3 months ahead, then bake directly from frozen the day of. If you have to bake ahead, make them the morning of and reheat at 350°F for 5 minutes just before serving so the pastry crisps back up.
Are these the same as turnovers?
Close but not identical. Turnovers are typically larger, almost always triangular, and use a less-thickened filling. Hand pies are usually smaller, can be any shape (squares, rectangles, half-moons, triangles), and have a thicker, more pie-like filling. The pastry can be the same.
Final Thoughts
These berry hand pies are the recipe I trust more than almost anything else in my dessert rotation. They look beautiful, they feed a crowd or freeze for an emergency dessert, and they let you use whatever fruit is in season without rewriting the recipe. The tart-sweet pairing rule is the one piece of advice I would tattoo on someone if they were starting out with fruit pies — once you internalize it, every filling you build from scratch in September and beyond will taste better.
If you make these, leave a star rating and a comment below — I genuinely love seeing which fruit combination people land on. Save the recipe to Pinterest so it is there when summer berry season hits. And if you are on a pastry kick, my apple cinnamon pop tarts and spiced banana rhubarb muffins are the next two recipes I would point you toward.
Happy baking, friends.